Image optimization for SEO purposes is an art you should learn how to master. Since images take a lot of space on your website, it’s only natural to find ways to optimize them not only for better user experience and functionality but also for better ranks and traffic.The big dilemma is finding the balance between a well-optimized image that still preserves its visual quality and a fast, high-peformance website. Thus, the better question to ask is: Can optimized images help/complement your SEO efforts?
We shouldn’t add pictures to our content for the sake of having something to break our content and create more lines. That’s not the recommended way to use visual content. There are lots of situations when pixels are sacrificed and pictures have a bad-looking aspect. Why should some innocent pictures end up pixelated after compression when there are lots of other ways to optimize images and still keep the visual aspect? So, we gathered the most important tips that will help you not only optimize the images for SEO but also speed up your website and help you in your SEO endeavour.
- Choose the Right Image Format
- Optimize Image File Weight
- Save Images at Smaller Resolutions
- Resize Images to Scale
- Reduce the File Size Using Plugins
- Remove Any Irrelevant or Unneeded Metadata
- Name Your Images and Add Alt Descriptions for SEO Success
- Use SVG Files to Have a Higher Clarity and Lighter Website
Our previous researches and case studies about the connection between images and SEO got us to this image optimization topic. We discovered then that Google can read text from images, which can have huge implication in rankings and Google Image Search world in the future.
It is highly possible that in the very near future, Google will probably change the algorithms regarding the way it will rank images. That change will dramatically impact the search, and thereby the SEO world. Especially since Google is using the object detection in images. Therefore, it is best to be prepared and follow our next image SEO tips to help Google “read” & rank your images in the near future.
1. Choose the Right Image Format
There are multiple file types for visual content, each serving for a different purpose. If you choose the right file, it will turn out to be a huge improvement. For web, you can choose:
- JPEG format when you have pictures with a lot of color, color gradient and shading.
- PNG format when you have a logo, or it is a picture with a lot of solid color or you need to use transparency.
- GIF format when you have an animation or in the same situation explained or the PNG format.
| JPEG | PNG | GIF |
 |
 |
 |
Ilya Grigorik, Web performance engineer at Google, explains how you can choose the best file format for your picture through the next representation in Web Fundamentals on Google Developer website.
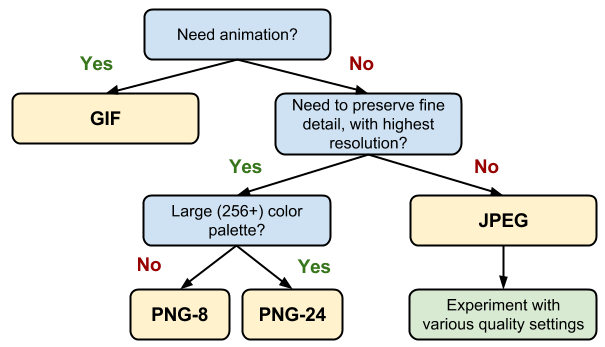
Source: developers.google.com
Having the right format and the right picture can influence a lot the future of your content. More and more businesses invest in the visual appearance of their content. That’s why 51 percent of B2B marketers prioritize creating visual assets as part of their content strategy.
2. Optimize Image File Weight
Reducing the image quality can improve a website’s speed for loading the page faster. Fast websites mean better user experience, which in turn leads to increased conversions. According to a study by Kissmetrics, 1-second delay in page response can result in a 7% reduction in conversions.
An even bigger problem is for mobile users. Images account for 68% of total page weight and tend to be too large, too many and often times unnecessary, slowing down the page load and preventing the user from accessing the information.
The size of an image is given by its quality, or the number of pixels. If a picture has more pixels, it will lead to a higher size, dimension, and quality. That’s why reducing quality by 15-20% is recommended for JPEG and PNG formats. A lot of dedicated softwares have this option.
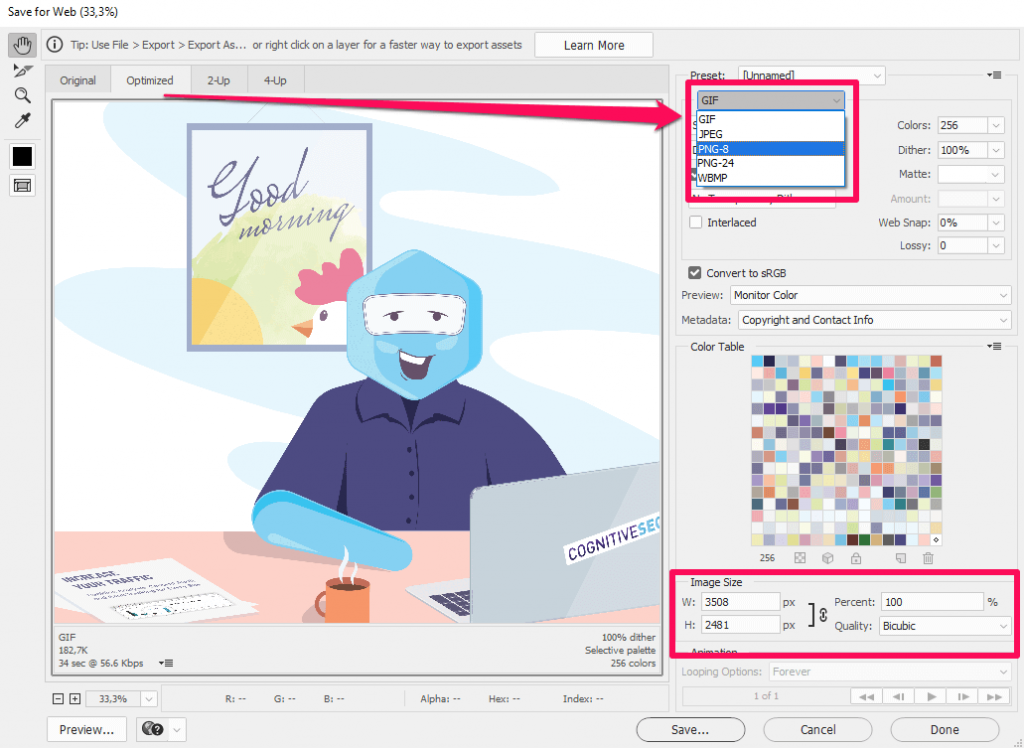
In Adobe Photoshop, for example, for both JPEG and PNG there is the option to optimize images for web. The steps are quite simple: Export » Save for Web » Quality 85% (Use the photo viewer on the left to determine if you can compress the picture more and how it looks) » Click Save.
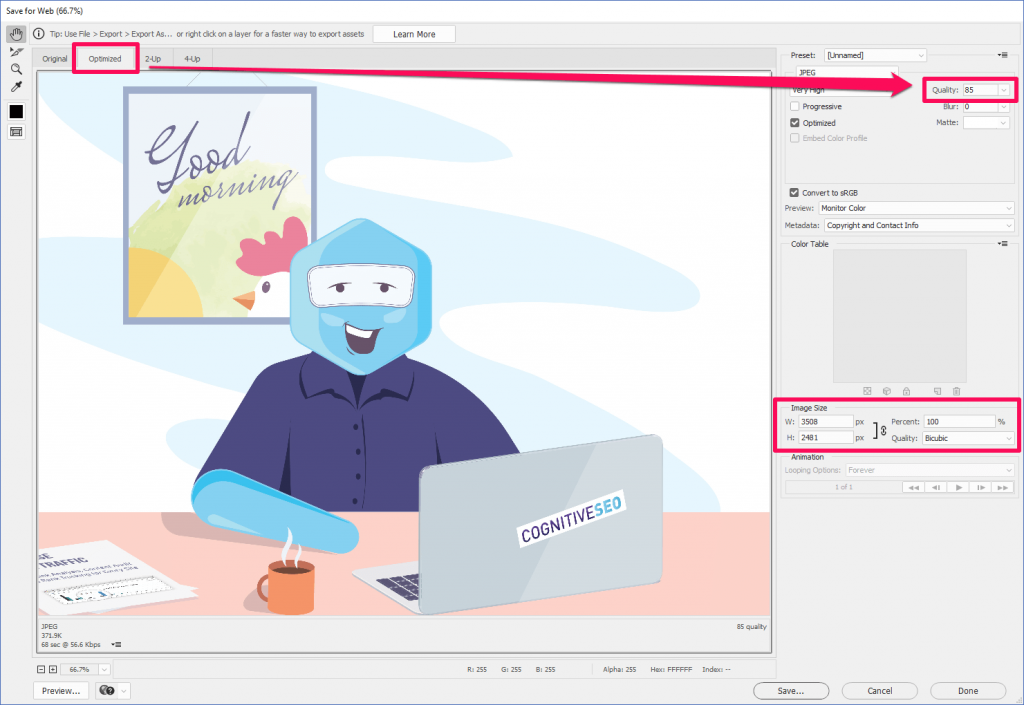
The higher the percentage, the better the quality of the photo. For PNG pictures, there are other optimizations you can choose from, such as PNG 8 bit and PNG 24 bit. It would be recommended to save it as a 8-bit png to have a lightly sized pictured.
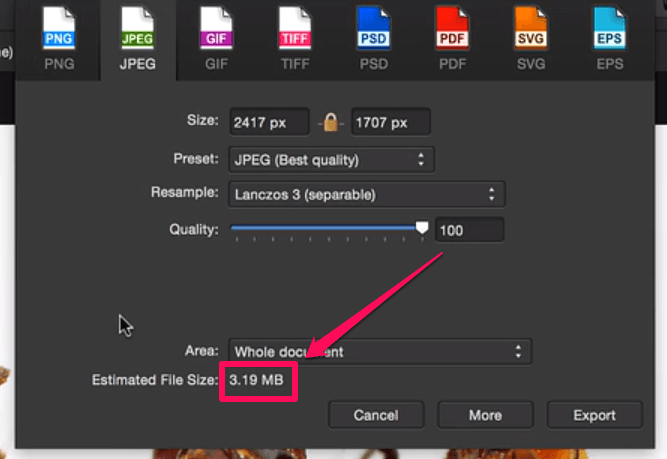
Affinity Photo is another option for compressing images, which can be similar to Photoshop, but cheaper. In the example below, you can see that the image size is 3.19 MB.
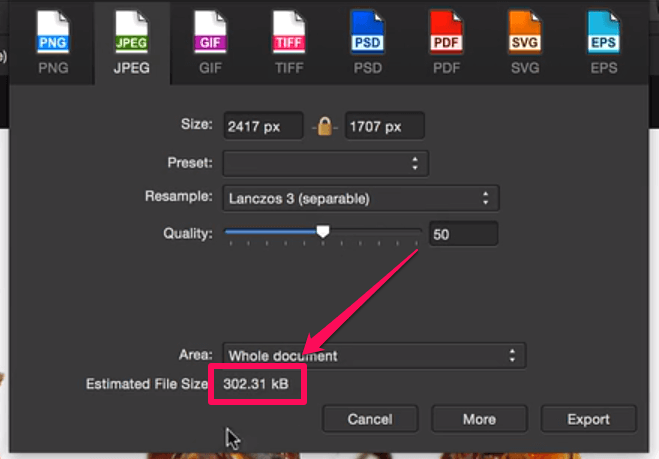
For a high export compression efficiency at 55% quality, the size will decrease at 303 kB, which is 10x times lighter.
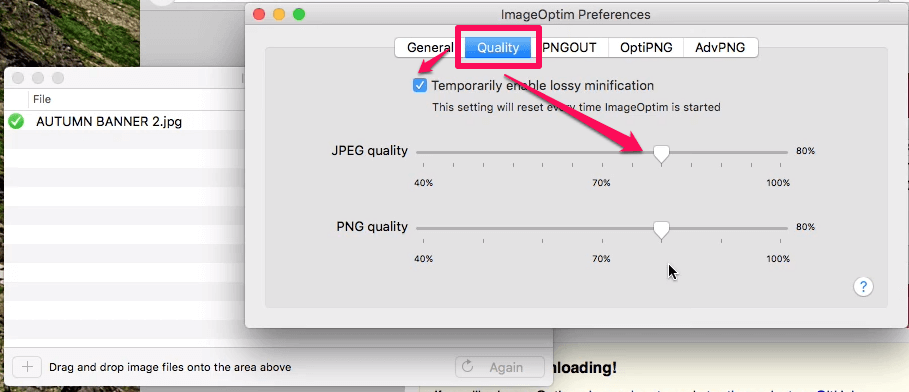
There are additional, easier to use softwares in order to reduce the quality of images, such as Gimp and other small softwares for beginners, such as GIFsicle, JPEGtran, JPEG Mini, OptiPNG, pngquant, FileOptimizer, ImageOptim (see the picture below).
If you want to choose the easiest way and not to download any software, there’s the option to use online editing tools for compressing images. TinyPNG and Trimage are two of the most used.
There is also the PageWeight by imgIX, where you can add your website and evaluate the “amount” of visual content. For that, there are calculated three main metrics for each site, represented using color bars (light, recommended and heavy) as you can see in the screenshot below. In our example, we have a light website content weight, light image weight and a few recommendations for a better image optimization.

Below, we can see an exemplified report and the actions that must be taken:
- How images are affecting your page weight;
- Your worst performing image;
- Your page’s image breakdown.
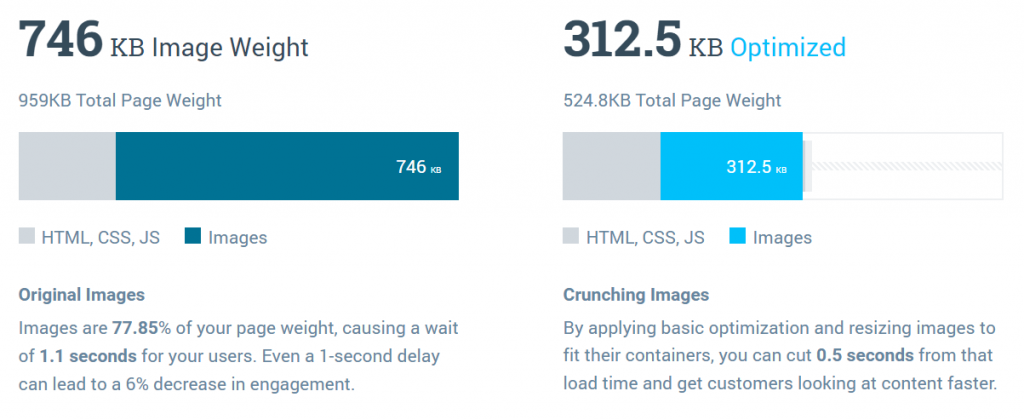
For each result, there are some recommended actions we could take to improve the delay of your load page, optimize images to lower the weight.
3. Save Images at Smaller Resolutions
Another image optimization solution is to save pictures at a smaller resolution. Resolutions refer to the number of pixels in an image. The editing software identifies the resolution as the width and height of an image and the number of pixels in that image.
For example, if you have an image that is 500 pixels wide and 281 pixels high (500×281), it will have 140,500 pixels (we multiplied the number of pixels on width and height), which means 141 KP.
For a larger image, the resolution will be bigger. For example, if we have a high-quality image at 1920×1080, the resolution will be 2.07 Megapixels.
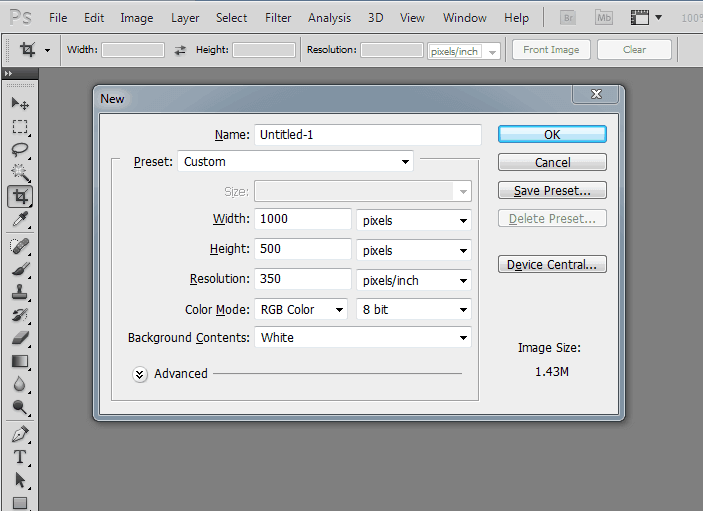
In graphics editing software we have the possibility to choose your image dimensions and resolution, which can be a little bit misleading, because we cannot have images with the same size on different resolutions.
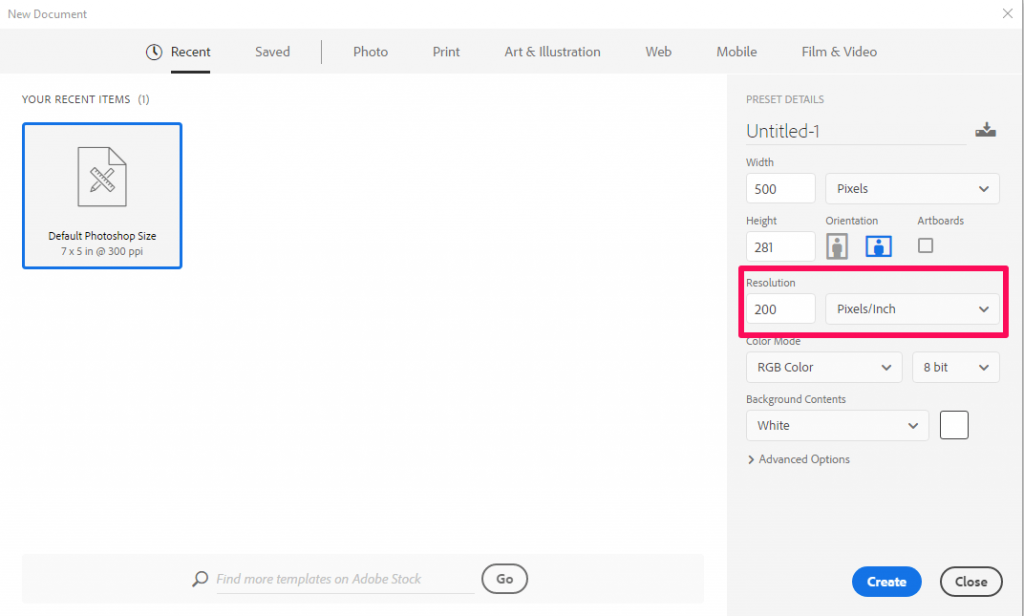
An image with 500×281 at 72 ppi, 300 ppi and 1000 ppi will look exactly the same and the number of pixels will be 141 KP.
HTTP Archive performed some interesting analyses regarding the breakdown of website sized by content type. The results were incredible. Below you can see data from that report. You can easily see that images have the highest weight on a website.
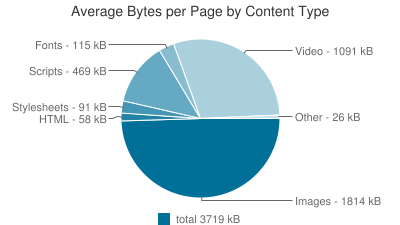
The sizes presented in the chart are the transfer sizes, therefore the compressed responses are counted to be smaller than the original, uncompressed content.
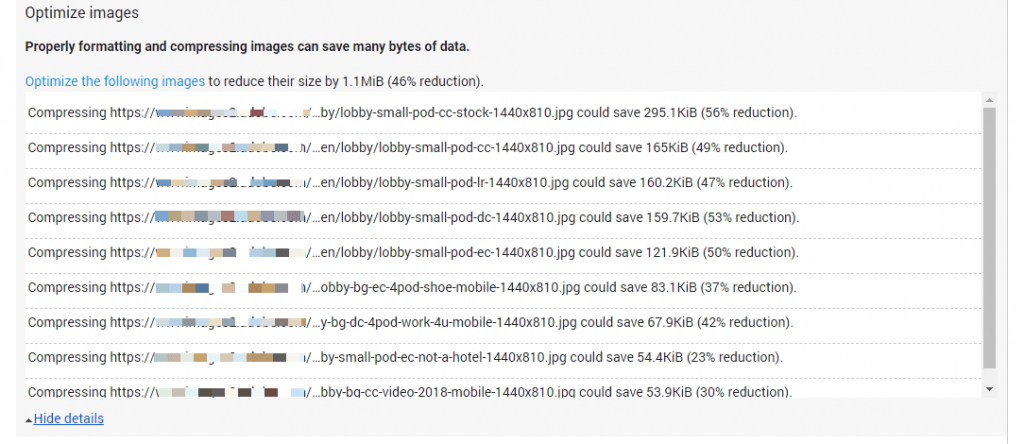
Google’s PageSpeed Insights can show you images that need to be compressed and the space you’ll save after that. In the example presented below, you can see the files that need to be compressed. If you compress them, you will save 1.1MiB.
Pixlr Online Photo Editor is a free and online option for lots of editing needs and it can be used for saving images at smaller resolutions. Also, you can use it to apply layers and effects. It has a similar interface as Adobe Photoshop.
4. Resize Images to Scale
When you upload images on your website and want to optimize them, it is recommended to resize them to scale, and not let CSS resize them. This method can be applied only if don’t have responsive pages, otherwise it is not relevant. Another thing worth mentioning is the fact that you shouldn’t just scale images without taking any other optimization techniques into account. It works best with the next recommendation, reducing file sizes through plugins.
Being a WordPress user, you have a lot of advantages. For example, in this case, your images will be resized by default when you add them to the media library. You can easily access that option if you go to Settings » Media. The max width of the picture must be close to the width of your site. This way, CSS will not resize your images down to fit inside.
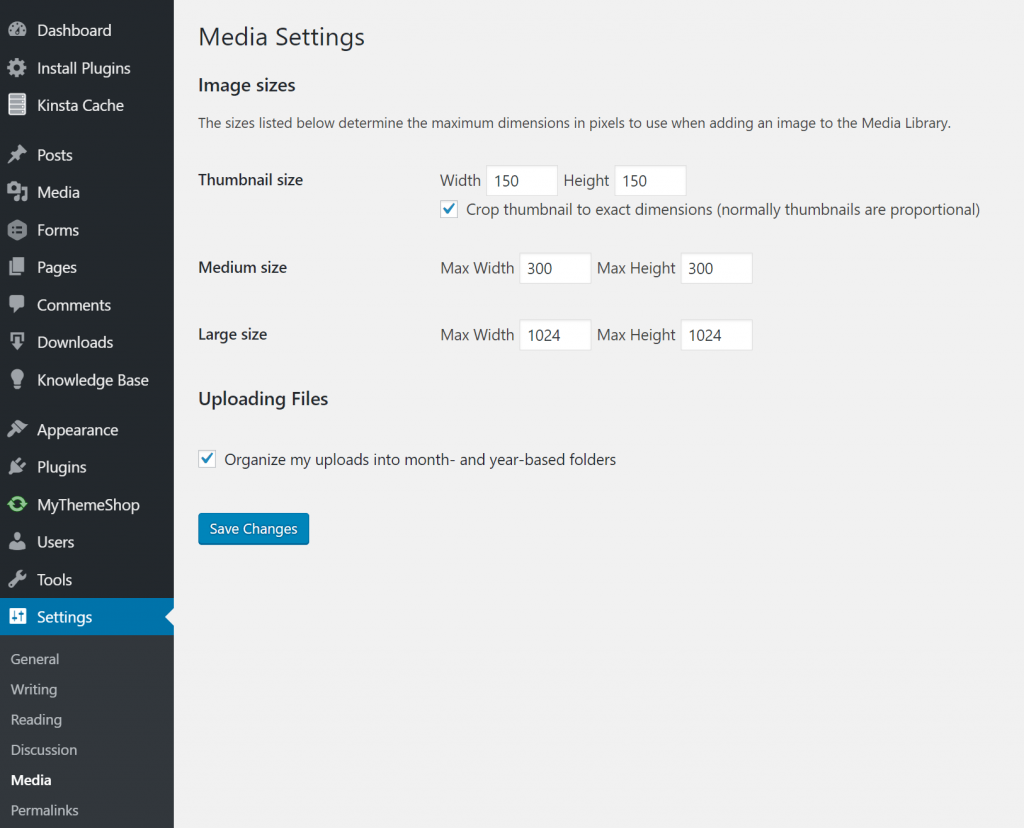
Some other recommendations worth mentioning in this case are:
- Use CSS3 effects as much as possible;
- Save your images at the dimension you want instead of letting HTML or CSS resize them;
- Crop the white spaces from images and recreate them by using CSS to provide the padding;
- Reduce the bit-depth to a smaller color palette;
- Choose web fonts and avoid placing text within images because this way you won’t have problems at scaling and it will save space;
- Use raster images (represented by a collection of countless tiny squares/pixels) only for scenes with lots of shapes and details;
- Minify your images with Gzip compression.
5. Reduce the File Size Using Plugins
If you’re a WordPress user, you should be glad to find out that there are also automatic ways to compress your images, by using plugins.
Plugins can work very well as a second step for image compression. Don’t ever use it alone. For example, adding a picture that has 2MB in the library can result in eating up your web hosts disk space really fast. You need to select the plugins that suit you the best and get to work. For each plugin the steps are easy:
Sign in your WordPress » Plugins » Add New » Search for the plugin » Install now and wait for a few seconds » Activate. Then, if you like you can go to the specific Plugin and look through Settings to make sure everything is according to your needs.
WP Smush, CW Image Optimizer, Insanity, Hammy, SEO Friendly images or PB Responsive Images are just a few examples of plugins that will automatically and losslessly compress your images. All the plugins can be used to optimize images that were previously uploaded or added after the install.
Below you can see a speed test performed by Kinsta using Pingdom before and after compressing images. For the uncompressed JPEGs, the website had a 1.55 seconds load time and a 14.7 MB total page size.

Source: kinsta.com
For the compressed JPEGs, load times were decreased by 54.88% and page size was decreased by 80.27%. The results speak for themselves:

Source: kinsta.com
As a suggestion, you should keep your image file size weight under 120 kb for large images (1920px & up) and even lighter for smaller images. As a general rule, keeping most images around 50 kb is the best.
Brian Jackson, Dir. of Inbound Marketing of Kinsta, explained in an article on Optimus, the different types of compression when it comes to reducing the size of your images for the web.
| Lossy compression refers to compression in which some of the data from the original file (JPEG) is lost. The process is irreversible, once you convert to lossy, you can’t go back. And the more you compress it, the more degradation occurs. | |
| Brian Jackson | |
|
Dir. of Inbound Marketing Kinsta |
|
On the other side,
| Lossless compression refers to compression in which the image is reduced without any quality loss. Usually this is done by removing unnecessary metadata from JPEG and PNG files. RAW, BMP, GIF, and PNG are all lossless image formats. | |
| Brian Jackson | |
|
Dir. of Inbound Marketing Kinsta |
|
6. Remove Any Irrelevant or Unneeded Metadata
Metadata is the information stored in the image file and usually, it is generated automatically by the device that captured the image.
Additional metadata, such as EXIF data (a record of all the camera settings) can be added manually using dedicated software or directly on digital cameras. All sorts of information – such as exposure time, aperture settings, camera type, date taken, author and other information – can be embedded into an image. That information is crucial for the particular websites (photography, for example), while for other websites it might be completely irrelevant.
Sanitizing your image can be extremely beneficial for improving website’s loading speed time. If you take a look at the next picture, you’ll see what kind of information can be embedded into an image. You can easily access that data if you go to the Properties of the image and then select Details.
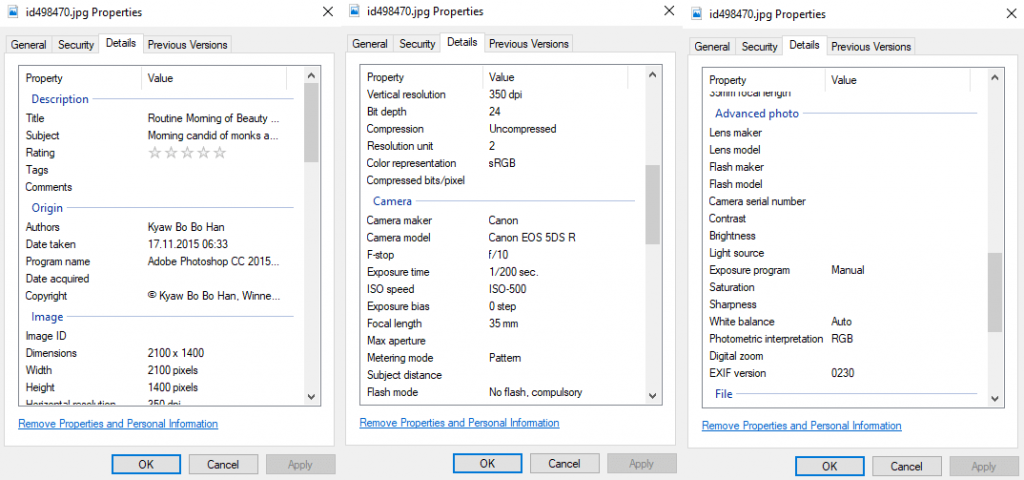
Choose what to delete and what to keep by easily going into the Value cell for each property and deleting the content. If the file is on Read-only mode, you won’t be able to edit that information. But there are other ways to review it by using the Google Chrome extension, EXIF viewer, which will be accessible by a tiny camera from your browser. At just one click on the icon you’ll get all the Exif data.
Photoshop or Adobe Lightroom are other examples that could help you get rid of unneeded EXIF data. Go to File » File Info.
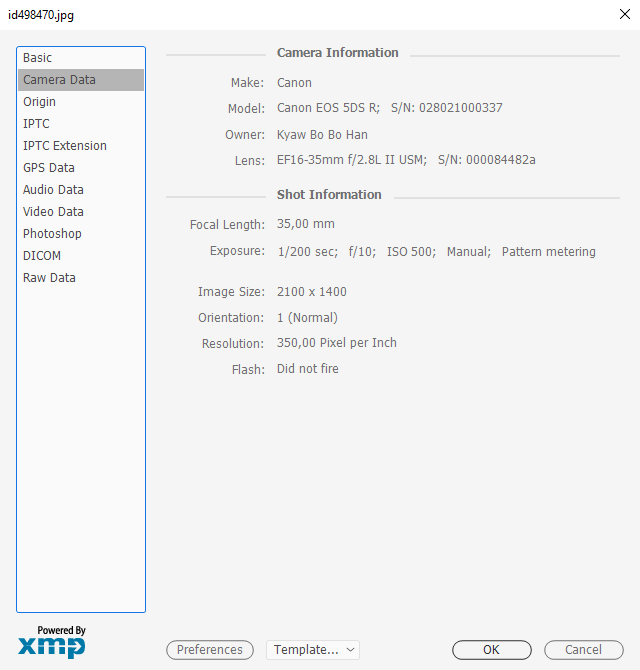
Make sure you keep the data that is important for you and delete the unnecessary image data. This way, you can optimize your images and make it easier for search engines to understand your visual content better.
7. Name Your Images and Add Alt Descriptions for SEO Success
Getting your images easy to read-on by Google and making them friendly will empower SEO success for your website. You can kick your SEO game up a notch by giving your images relevant names and keyword-rich alt text descriptions, without taking advantage of this and practicing keyword stuffing.
If necessary, use description for your image or caption. You can add these elements, by following the previous step, where you can save the metadata regarding the description, author and name or the file.
In case you don’t have that information embedded in the file, add it directly when you upload the image on your site. WordPress makes it easier for the user to edit the data they want Google to access.
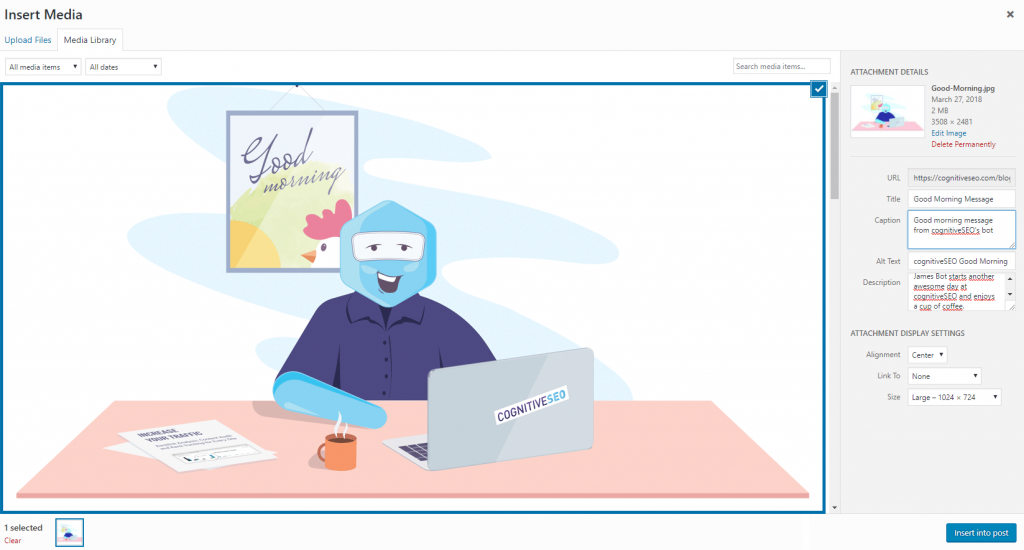
Search engines crawl both the text on your website and that embedded in your images. Make sure you don’t use generic names, such as DSCN093298.png, Image01.jpg or animation-version1.gif and so on, but rather descriptive file names. Title tags and image alt texts are crucial when a browser can’t render your website properly.
8. Use SVG Files to Have a Higher Clarity and Lighter Website
SVG is used for logos, icons, text, and simple images. The entire content of Scalable Vector Graphics is just text. Just take a look at the example on W3Schools. On the left side is the content of the file and on the right side is the rendered version of the text, where you could see what it looks like. That’s exactly how the users will see the SVG file. If you try to change the color or dimensions, the quality of the image won’t be damaged, it will be preserved.
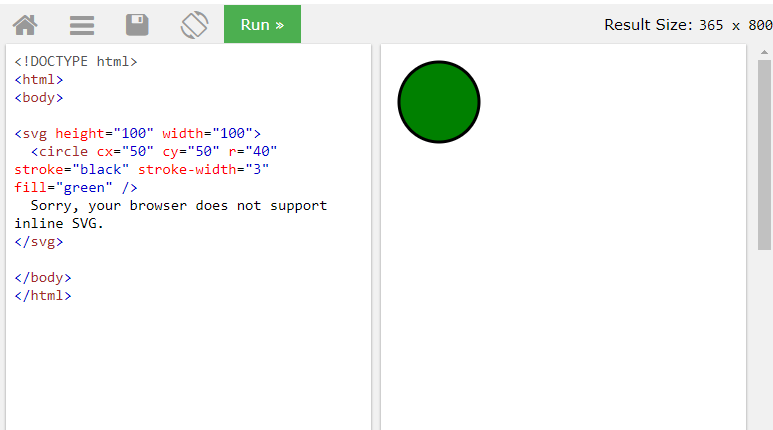
Using SVG file is another recommendation for creating better websites. You can still have PNGs and JPEGs on your site, but in addition, it is very good to use vector images whenever possible.
Ilya Grigorik explained the difference between image vectors and raster images. Just like I’ve mentioned before, raster images are used for complex scenes with irregular shapes and details. Vector images, on the other side, are ideal for images that consist of geometric shapes.
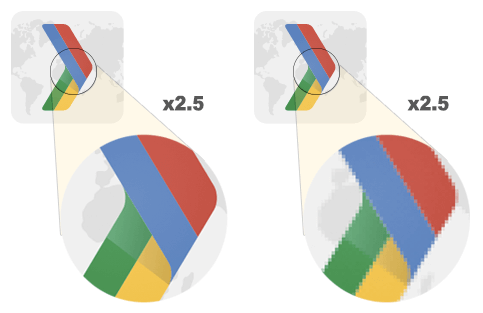
Source: developers.google.com
Vector images carry great advantages:
- They are scalable in both browser and editing tools. You can zoom in and out without affecting the quality;
- You don’t lose SEO quality. SVGs are indexed in Google the same way JPEGs and PNGs are;
- Usually, SVGs are smaller than JPEGs and PNGs.
Conclusion
When someone is surfing the internet, the browser needs to download every file from your website to render it. On a large scale, that means pictures, which can store a lot of irrelevant data and pixels.
We’ve explored the topic and found lots of embarrassedly simple ways to reduce the image file size by editing the quality settings. We gathered our tips and resources that we followed thoroughly over the years. Saving an image for web, using image optimization tools, removing irrelevant metadata, resizing image to scale are just some examples on how you could optimize your images.
Use GIF and PNG formats because they are lossless. The desired format is PNG because you can achieve the best compression ratio with a better visual quality.
In the end, make sure you test your visual content using plugins, tools, and software to ease up the process.

 Site Explorer
 Keyword tool
 Google Algorithm Changes

Thanks for putting your thoughts together on this. I’m curious if you have had experience with inline SVGs and their indexation. Have you noticed any issues with inline svgss showing in Google’s image search? Any issues with embedded svgs?
Hi Todd,
We haven’t encountered any issues of that kind until now. I’ll let you know if I find anything related.
Great post. Very detailed, well researched and comprehensive.
Great post! What about “lazyloading” images? What are your thoughts on that?
Hi Johan,
Thank you! I think it is a good idea to use lazyloading images because they don’t use so many resources to load all the page at once.
Thanks for giving tips on optimizing images; hope can help in website loading speed.
Thanks for sharing this post.this is very helpful for us.
This is going to help me a lot.Hope you will keep on posting to update us.
Your article is very detailed and comprehensive but one thing I would like to add is that focusing too much on images for SEO can be time-consuming if there are very few images on your website. In that case, content and other factors would matter more.
Very useful information.
I would add to #7 regarding to SEO.
Create and submit a sitemap (only for images)to google.
So much useful information on optimizing images. Can you let me know the best way to remove the EXIF data before uploading the image on WordPress blog?
Term: image optimization for SEO
Comment:
First of all, thanks for the nice tips. I too believe, Alt Tag plays a most important role in SEO things because the search engine cannot read the image but it can read the text which is nothing but Alt Tag.…
Also, everyone should make sure to insert the title into the images by using HTML code for SEO purposes. The images can help site owners to increase traffic and also sales. I have used Picasa for image re-sizing and it has worked out great so far. After image compression, it creates an ability to reduce blog loading speed and I think it’s better for SEO as well.
I have to admit that I do concern myself with the keyword in the image, the image file size, and open graph. These Image SEO tips help me a lot to find images in a better way. I hope this might be useful for my blog.
Great article! you have covered everything about image SEO. Keep up the good work..!!
It is beneficial, Indeed, and very clear to understand! and the best post on the subject that I have read. Great job!