 Site Explorer
 Keyword tool
 Google Algorithm Changes
An SEO website redesign is not a walk in the park, and it could easily become an SEO disaster if you don’t do it right. Any change you make to your website’s redesign can cause traffic loss and make your current site not so very “search engine ranking” friendly.
Maybe you want to switch to https, you want to go international, or maybe you just want to start a rebranding strategy. Whatever you do, you want your link juice, rankings and traffic to remain the same. And, when you’ve put a lot of SEO effort into your site, you wouldn’t want all that hard work to be in vain, would you?
And because we know how much our beloved cognitivies treasure their work, we came up with a list of the exact steps you should follow for a successful SEO website redesign. To get the full SEO website redesign checklist, click on the button below. You will get a Step-by-Step Checklist Spreadsheet you can fill up for successful rankings and traffic and why not, for great SEO strategies.

You might be tempted to say: “Do I really need to worry that much about my site redesign? Will it really affect my rankings and traffic? As long as I have great web developers, awesome onpage optimization, I did lots of SEO audits and I have a shipshape content marketing; what can go wrong within a simple website relaunch?”
If this kind of thoughts crosses your mind, I invite you to take a look at the screenshots below, documented by Glenn Gabes in a related post.
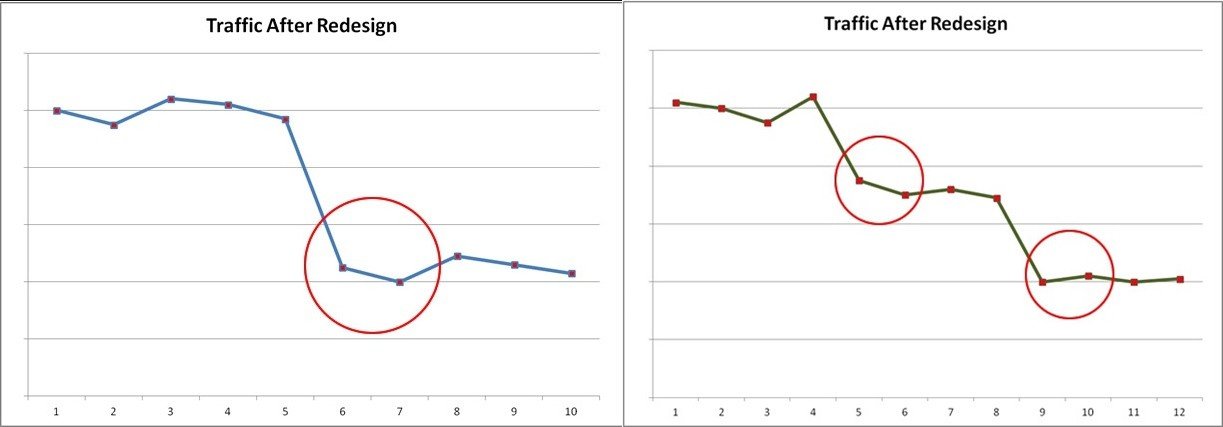
Makes you wonder, right? We don’t want to scare you and make you run away from any form of online marketing; we just want to make you aware of the attention you need to treat the website redesign SEO process. Below you can find the full list of steps you need to take for a successful redesign or migration.
Download The Website Redesign SEO Checklist
PRE-LAUNCH
- Have a Temporary Dev URL
- Create a New Robots.txt File
- Benchmark Current Search Engine Metrics
- Check If Your Server Supports the New Design
- Crawl the Old Site and Audit It
- Make a List of Your Backlinks
- Check for Blank / Doorway Pages
- Check for Remaining Template Pages
- Avoid Deleting Old Content
- Keyword Mapping/Remapping
- One Topic/Keyword per Page
- Proofread Your Content
- Search Engine Friendly URLs
- Verify Previously Owned Domain
- 301 URL Mapping (Prepare a Redirect List)
- Add/Update All HTML Annotations
- Check External/Internal Linking
- Prepare an Old and a New Sitemap
- Check Mobile Compatibility
- Check Pagespeed Insights
- Check Image Size
- Consider AMP and Instant Articles
- Check Microdata Implementation (or Consider Adding It)
- Check Cookie Law
- Check Legal Compliance Pages
- Check Contact and About Pages
- Check the 404 Page
- Remove Meta Keywords
- Share Buttons
- Subscribe Buttons
LAUNCH
- Visually Inspect (Test) Your New Site
- Get a Warning Message Ready
- Set Up a Monitoring Plan
- Tracking Codes Placement/Remplacement
- Set Analytics Goals
- The Time You Launch
- Post the New Version
- Remove Password
- Check Robots.txt
- Set Up the 301 Redirects (Without Domain Change)
- Set Up the 301 Redirects (with Domain Change)
- Review Search Console Settings
- Disavow Files
- Reindex Site from Search Console
- Annotate the Site Launch in Google Analytics
POST LAUNCH
- Check Search Console Errors
- Crawl the New Site and Audit It
- Compare the Results
- Check Your Server Logs
- Update Social Media Website URL
- Match Social Media Designs with the Website
- Monitor Your Website Thoroughly
- Check Number of Pages Indexed
- Make Sure All Wanted Pages Are Indexable
- Monitor the Cache Date of Indexed URLs
- Clean Up New Domain
- Update Backlinks
- Check and Compare Search Traffic
- Compare Your SEO Visibility
Conclusion
PRE LAUNCH
1. Have a Temporary Dev URL
First thing on the SEO redesign checklist is to create a temporary development URL. A temporary development URL can save you in the pre-launch phase. If you don’t want to risk getting your site indexed, you should develop a site on a different URL, like a subdomain. Make sure you protect it by using a password. If your site already got indexed, there’s no reason to block it anymore. When it’s ready, change the domain to the “real” URL and go live.
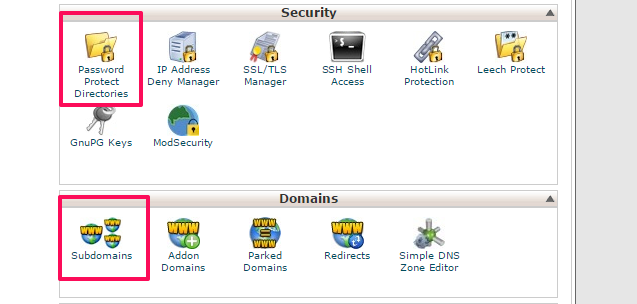
You can set a subdomain to work on. In the cPanel of your Web Host Manager find Subdomains, and add a subdomain. A new folder will be created, and you will be able to upload your work via FTP or the cPanel built in File Manager. To password protect it, find the option Password Protect Directories, select your Subdomain folder and add a password. When trying to access the URL, a login popup will show up in your browser.
2. Create a New Robots.txt File
Secondly on the pre-launch SEO checklist, you need to create a new robots.txt file.
A robots.txt file is essential in the pre-launch phase because it gives instructions to web robots about your site. You have to place this code in the top-level directory of your web server to block the robots from getting information: User-agent: * Disallow: / The “User-agent: *” means it is applied to all robots and “Disallow: /” means they cannot visit any pages on the site. There are cases when the robots can ignore the robots.txt file. They could scan your website for security vulnerabilities. So don’t try to hide information. Other examples for creating your robots.txt file based on how much access you offer:
- Allow all robots complete access:
User-agent: * Disallow:
- Exclude all robots from a part of the server:
User-agent: * Disallow: /cgi-bin/ Disallow: /tmp/ Disallow: /junk/
- Exclude a single robot:
User-agent: SingleBot Disallow: /
- Allow a single robot
User-agent: Google Disallow: User-agent: * Disallow: /
- Exclude all files except one
User-agent: * Disallow: /~john/folder/
- Or disallow all disallowed pages:
User-agent: * Disallow: /~john/cars.html Disallow: /~john/bicycles.htm
Download The Website Redesign SEO Checklist
3. Benchmark Current Search Engine Metrics
A lot of SEO specialists make website audits before any major change. It is recommended to benchmark your current performance process in order not to lose SEO efforts. You can compare your engine metrics with the data before and after you launch your site. Google Analytics gives you the possibility to compare your data with the industry best performance. If you can’t see your benchmark data, you should enable this feature. First, you need to Sign into your account, then select Admin tab, click account settings (under Account), select Benchmarking checkbox and then save. After you follow all the steps, you can see a Benchmarking Dashboard similar to the next screenshot:
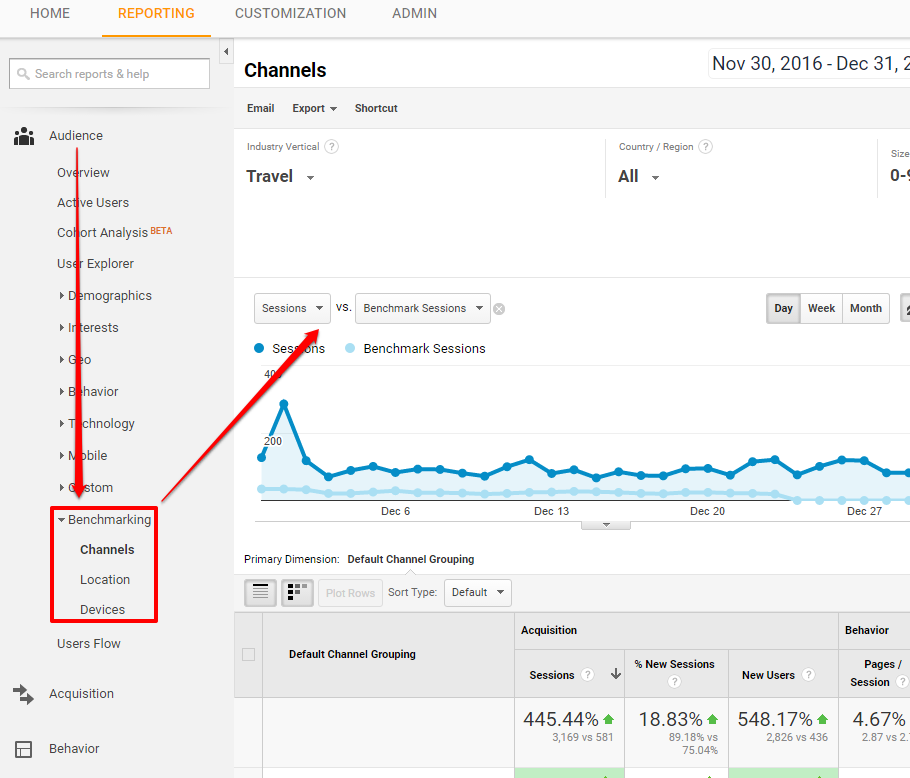
You can extract and visualize the following metrics from Google:
- Analytics in the Benchmarking section:
- Sessions (i.e. number of sessions);
- % New Sessions;
- New Sessions (i.e. number of sessions from new users);
- Pages / Session;
- Avg. Session Duration;
- Bounce Rate.
4. Check If Your Server Supports the New Design
Checking if your server supports the news design implies a functionality testing in software and hardware. A software testing is used to check whether the application performs or not according to the design specifications. A hardware testing involves the verification of the composition of the actual hardware components of the server.
Functionality testing in software certifies that the core applications are fully functional after localization.
In the process of website redesign, when you change your website from a server to another one with different specifications you should keep your website in testing mode until you see the tasks work properly without any errors: the core applications respond to requests, the shop orders and sending/receiving emails run without a problem. For example, most redesigns include new plugins like Woocommerce (for WordPress) which requires more PHP memory. Make sure your server can handle it.
5. Crawl the Old Site and Audit It
In the pre-launch phase, you should start an audit of your old site architecture to get the full picture of how your site’s structure looks like. You can make a website audit using lots of tools. A few examples you can find here. Before making a redesign or a migration, you need to crawl your site to gather all the metadata and URLs to identify the required adjustments. Screaming Frog SEO Spider is a website crawler that can analyze, audit and review your website from an SEO perspective. A free option is combining Screaming Frog with Xenu Link Sleuth. Xenu only checks for broken links, but you can upload the list of links to Screaming Frog, which offers unlimited crawling when a list of URLs is provided. To finish this step – Crawling and Making a website audit – you should take the next actions:
- Fix broken links: You need to check your broken internal and external inbound links and then fix them all.
- Check important SEO elements: Check to see if you have missing title tags, meta descriptions, image alt descriptions
- Use unique titles: All your meta descriptions, headings and title tags must be unique, so verify them and fix those which are duplicated.
6. Make a List of Your Backlinks
Your inbound links are valuable; they bring visitors to your site and help you to rank better in SERP. Creating a list with these links would act as a backup. It will be very useful because you can keep a record of your backlinks. If you change your domain, you will see only the backlinks you receive after the launching phase. Make an account on CognitiveSEO tool to see your links. Below you have a screenshot from the tool with the backlinks for a site.
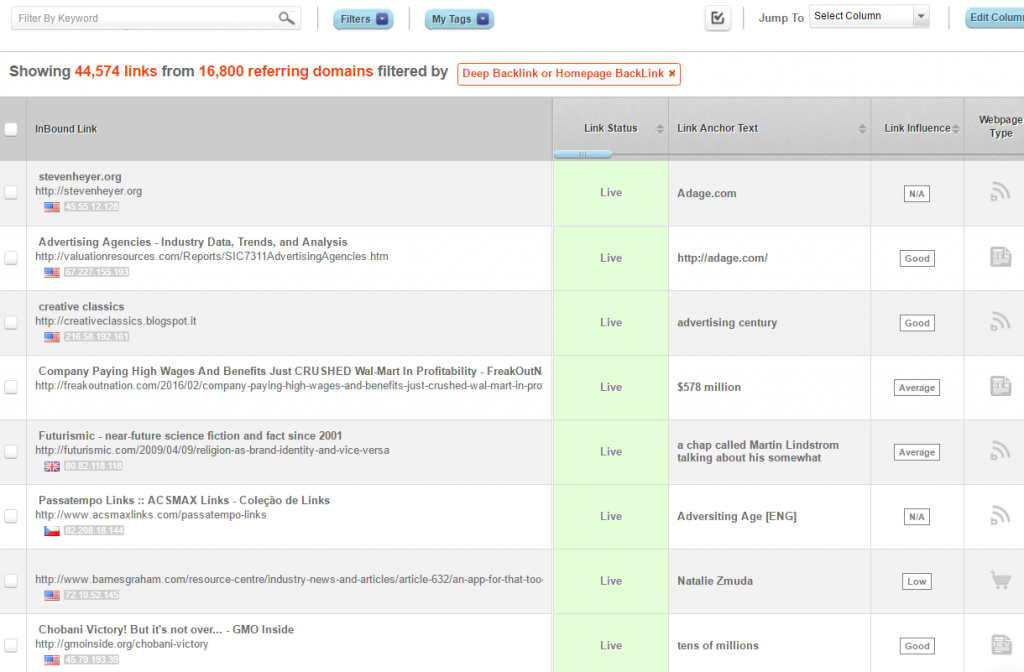
You can see the table in the InBound Link Analysis dashboard. Besides the head columns you can see in the picture (links status, link anchor text, link influence, web page type), you can choose from a large list which other features and metrics to analyze. At the bottom of the list, you have the Export to CSV option. Click it to download the list of your current backlinks.
7. Check for Blank / Doorway Pages
You can use crawling software to see if you have blank pages. Screaming Frog SEO Spider tool is a great example. It is not OK to have blank pages, but sometimes this happens, especially when you create a URL structure in CMS, such as WordPress. The doorway pages are a black hat SEO technique (that can destroy your current SEO efforts), but there are cases when that happens without your consent. For example, if you have a site that offers services to a worldwide market and you have a Service page with the same content for each city you risk falling into a trap. The pages that have similar content and the only element that’s different is the name of the city (such as “/services/new-york”, “/services/chicago”, “/services/miami”) should be changed, preferably compiled into a single page where users can select their city from a drop-down.
8. Check for Remaining Template Pages
There are lots of situations when the owner of a site saw a template on the web and wanted exactly that one. All those preset templates have their unique structure, with elements you could use and elements you could not. If, by mistake, you used a template of this kind and had other templates left they could easily mix and pass unnoticed along other pages. If you don’t want that to happen to you, please check your website for remaining template pages. Even though you didn’t notice them, the search engines will.
Download The Website Redesign SEO Checklist
9. Avoid Deleting Old Content
Old content shouldn’t be deleted. Everybody wrote content at some point that could use a little improvement in the present. Online, you can find lots of blog posts that are out the date. Instead of deleting old content, the best thing you could do now is to improve it. You can even find ways to repurpose your content. Content is a core element for SEO, and if you delete pieces of your content, you could end up with a blog that has content from one or two years ago. It’s like you would delete all the history you gathered. Not to mention that the backlinks you have received for that content will lead to broken links. And as top content can be a great link building strategy and could do great to organic search, you wouldn’t want to loose all of it, do you?
Old blog posts or articles should stay where they are.
Make use of your old content. It is easier to improve the content you already have than to write completely new content, find a proper keyword to rank for and optimize it.
10. Keyword Mapping/Remapping
A keyword mapping is a way of organizing your keywords. You can create a keyword map by yourself. Take a look at the picture below to see an example of a keyword map:
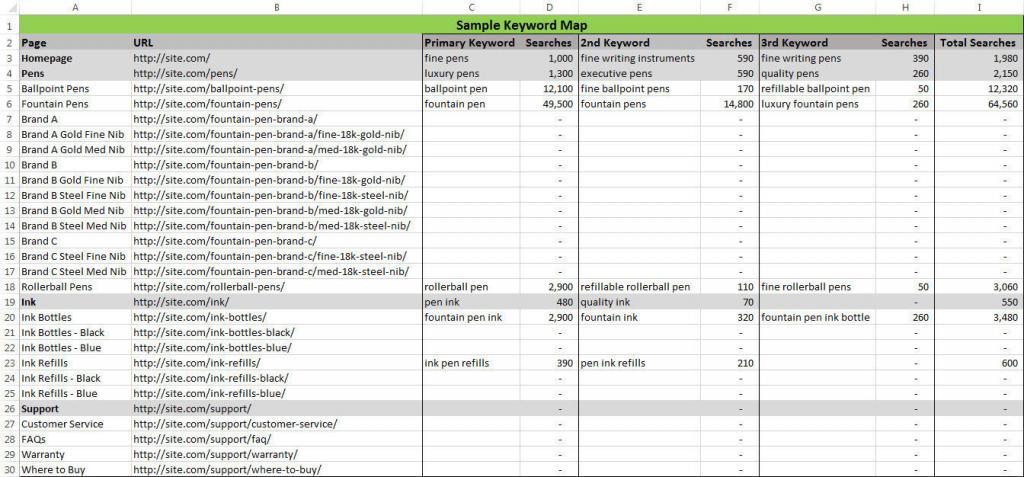
Source: http://www.practicalecommerce.com/wp-content/uploads/2014/08/KeywordMap.jpg
First, make a list with of 100 high ranking pages and place them in a spreadsheet. After that, write the core keyword for each article and the monthly searches volume (you will find that in Keyword Planner). Then you need to make a research for possible keywords for each page. Write the monthly searches volume for each keyword. It will be a starting point if you want to make improvements, assign keywords to pages and make historical optimization in the future. It is recommended to do that to verify your keyword strategy. You should check the keywords in high ranking articles for better search visibility and also you should take into consideration local search as well.
11. One Topic/Keyword per Page
For increasing your ranking in SERP, you need to optimize each article for a keyword. Your ranking depends on its authority and relevancy. The authority gives strengths to the article, and the relevancy is based on the pages you optimized for one keyword. If your landing page, site content, and links correspond to your keyword, then that page is relevant. Check every page to see if you’ve defined a core keyword for each piece of content. Make sure you focus your content on a single keyword and its variation to do semantic content optimization. Make sure your pages don’t address more than one topic/keyword per page, otherwise the authority for the respective keyword will be diluted.
12. Proofread Your Content
If you want to do things in a professional way you should always proofread your content. Proofreading might be an exhausting job but it is better to spend a few extra hours to make sure you haven’t written something that could quickly turn into a fiasco. Along the way, you can use tools to make the process easier. Grammarly is a tool you can use to check grammar errors or any other writing flaws. It has a plagiarism detector, too.
Words are a powerful tool if you know to combine them in a smart way.
13. Search Engine Friendly URLs
You need to check your URLs to verify if you’ve included query parameters in the URL structure. This is an example of a URL with dynamic queries:
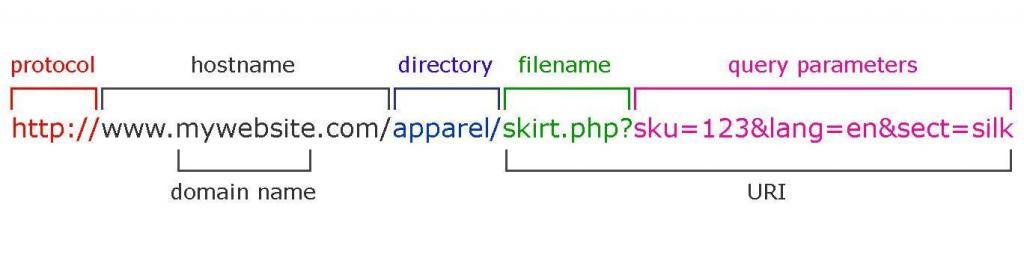
Source: http://3.bp.blogspot.com/-4ZilHEohMHE/Vpot9PAXBvI/AAAAAAAADE8/_31afn0kcRU/s1600/url-structure-query-parameter-2.jpg
It is hard for the Googlebot to understand what the URL is about. It might be difficult for the visitors to save it or use it as a source. On top of all that, it is not aesthetic. Take the next tips to improve your URL structure and make it more search engine friendly:
- use dashes (-) instead or underscores (_);
- make it shorter;
- use the keyword.
14. Verify Previously Owned Domain
Another important step on the prelaunch website redesign SEO checklist is to do a thorough check up if you have purchased an expired domain or simply a previously owned domain. There are some important additional steps you should take.
First, you should transfer Search Console ownership. You need to log in the Search Console with a Gmail address and then add a website property. Then you will need to follow the same instructions as you did when you verified your first site ownership. After that, you’ll receive all the data. The second thing you need to do is to check the backlink profile of the previous domain. As I mention before, you can use the cognitiveSEO inBound Link Analysis tool to verify the backlink profile of the new domain. In the tool, you can see the natural and unnatural links. Do a thorough check of the unnatural links to see if they are relevant to the site or not. Then delete the ones that are harmful. In case the domain is entirely new, it is not necessary to verify your backlink profile. If it’s an expired domain previously owned by someone else, it is recommended to verify your backlink profile. Check the next screenshot from the tool to see where you can find the unnatural link detection:

The third thing you should do is to take action against a spammy backlink profile. You shouldn’t close the tool just yet. Enter the Unnatural Links Navigator, filter the links to see only the ones with unnatural and suspect label. Check the next screenshot from the tool to see how the unnatural detector displays information for each link:
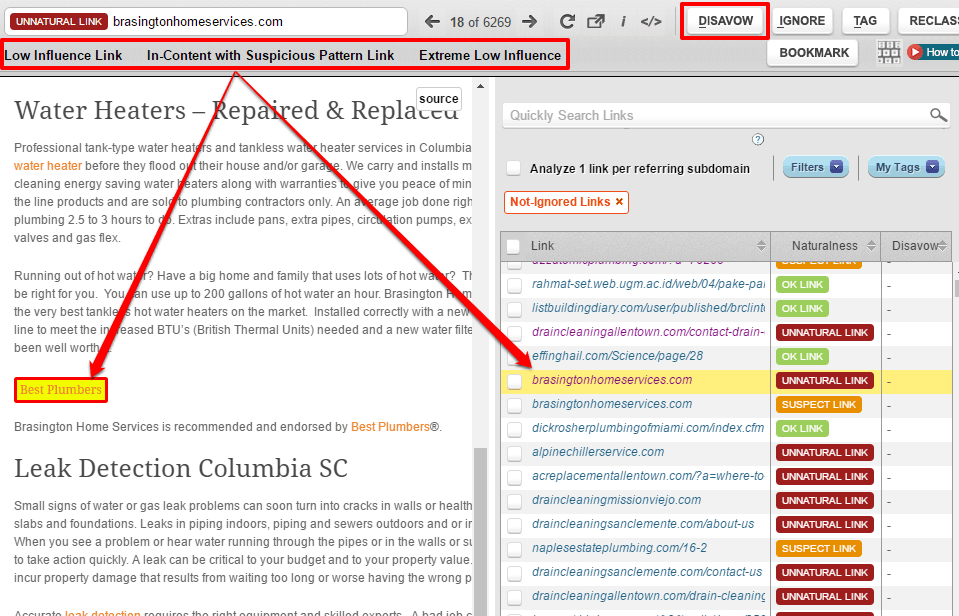
If you received this message: “This site has a highly unnatural link profile, and it’s likely to be already penalized by Google. You should use the Link Navigator to mark the unnatural links for Disavow or removal” you have found a highly unnatural link profile. Then you can prepare a disavow file right from the tool to submit it to Google. You can choose to keep some links that are marked as unnatural if you know they are natural. Make sure you reclassify them as natural. You can also start manually trying to remove the spam links by outreaching to the linking websites and asking them to remove the link. This is a time-consuming process, and it will be reminded in the Post-launch section. If this is the case, we strongly recommend choosing another domain. The last action you need to take is to clear any previous URL removals. In case the site you’ve purchased had a previous owner you need to check if there aren’t any URL removals left. Everyone has an “about me” or a “contact us” page. You should pay attention to those pages, in particular. Log in the Search Console and go to the URL Removal tool. You can see in the below picture an example of a URL removal.
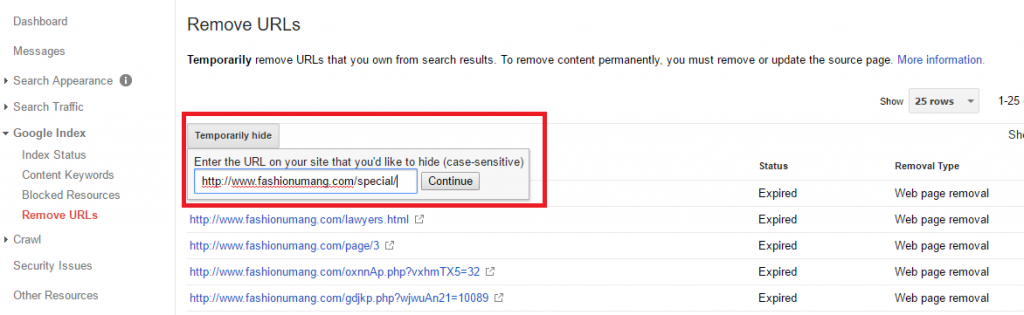
Source: http://www.seoofblog.com/wp-content/uploads/2016/10/paste-your-url.png
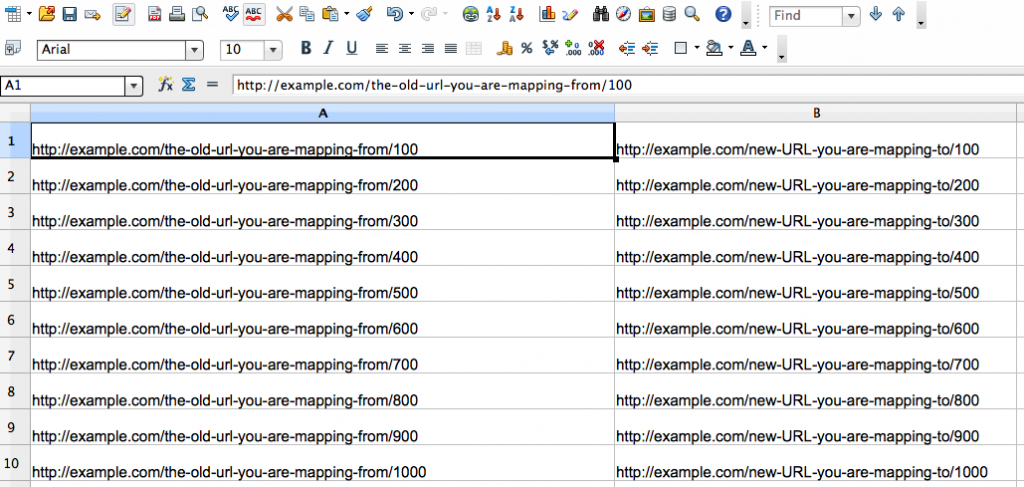
15. 301 URL Mapping (Prepare a Redirect List)
This is by far the most important step of the redesign. If your pages suffered URL structure changes, i.e. from .html to non .html or if you removed “_”, write them down in a spreadsheet. You can see an example of a spreadsheet of this kind in the next picture:
Source: https://disqus-cloudfront.s3.amazonaws.com/docs/spreadsheet-example.png
One column should contain the old URL, and the next one should contain the new, updated URL. An example of a tool that can help you with this is textmechanic.co to assist you in rewriting and sorting the URLs. You can do it in the .htaccess file, but there are also plugins for CMS such as WordPress. Don’t mix up 301 with canonical tags, as they are different things. Another example of a tool where you can do URL mapping is the one offered by Hubspot. To finish this step you need to follow the next actions:
- Write the 301 redirects: In case some of the URLs have changed, write the 301 redirect, from the old to the new version. If your website has a new domain, you have to note your redirects. Be careful to the chain redirects.
- Prioritize the URLs: Start with your most valuable URLs. The most important ones are those with the higher traffic. Enter Google Analytics into the Behaviour section, and then you will see All pages. There is a list of the most accessed pages. You can order the list by Pageviews, Unique Pageviews, and other metrics.
- Use a CMS if possible: CMS stands for content management system. WordPress, Joomla or Blogger are just a few examples of CMS. It is easier to write and to make changes. Also, a CMS provides an easy way to to get a listing of all URLs that host site content. If you have WordPress, you can install Simple 301 Redirects plugin to make the process easier.
- Check URLs in server log: Check your server logs for URLs that were visited at least once recently.
- Include static content URLs: The URLs need to be redirected in the same way as all the other content on the site. Make sure you redirect all the content you have on the old site, whether it is about the pictures, video, pdf or JS files. All your static content must be redirected.
- Don’t forget deleted pages: If you’ve deleted irrelevant pages from the old website, you should redirect them to the most relevant content on the new website, so you won’t lose the backlinks and the traffic you gain from that page. In case you don’t find a relevant correspondent, go for the home page. Don’t redirect them to irrelevant locations. You risk losing traffic if the visitors don’t see something similar to the original content. If you have grouped up 3 old pages into a single more complex piece of content, then you should redirect all 3 old URLs to the new one.
- Update internal URLs: for your files and images. Change the old URLs for all the files you had on the old site with new URLs. Make use of the URL mapping generated earlier to help you to find and update the links.
16. Add/Update All HTML Annotations
HTML annotations or HTML tags are used as a special form of syntactic metadata in the source code. Java annotations are used for classes, methods, variables, parameters and packages. Updating your HTML annotations is an important aspect in the pre-launch phase or your new website because you help Google to understand your site better. Update all HTML annotations in the URLs or Sitemaps, for every page. To complete this step, you need to:
- Add/update rel=”canonical” tag: Each URL should have a self-referencing canonical tag, maybe except for the Homepage. Also, if you have more pages that target the same keywords, you should tell the search engines which one of them you prefer to be shown in the SERPs using rel=”canonical”. For example, you have a product page for T-shirts of different colors, and the page has statically generated content. For each color, you will have a web page with the same product and the same content. You should use the “rel=canonical” tag to tell Google which one to show in the SERPs.
- Add/update rel=”alternate”: You should use the rel=”alternate” hreflang=”xyz” tag to show you the right language or regional URL in the search results. Add/update the language annotations if your website contains multilingual or multinational pages.
There are three examples of situations when you should use the tag. If you have a user-generated content, you can keep the main content in a single language and translate the template (navigation and footer area). You can use the tag in case your content has a few regional variations. For example, you have your content in the English-language and target the US, GB, and Ireland. Also, you can use the language annotation when your site is fully translated.
- Add/update mobile annotation: If you don’t have a responsive website design, but a mobile version on a separate subdomain (m.example.com) instead, you should use the link rel=”alternate” media=”handheld” tag. Add the link rel=”alternate” tag on the desktop page to point to the corresponding mobile URL to help Google identify the location of your site’s mobile pages. Facebook uses this tag; m.facebook.com is the URL for mobile.
- Add/update rel=”prev/next”: You can use the rel=”prev/next” link tag to show the relationship between component URLs in a paginated series. For example, if you want to show Google you have related pages it’s best to use this tool. Let’s say you write three articles, on 10th of November, 1st of December and 20th of December 2016. The tag tells Google that the blog post you wrote on 1st of December has the previous post on 10th of November and the next one on 20th of December 2016.
17. Check External/Internal Linking
Matt Cutts, Google’s former head of the web spam, quoted in the Google guidelines that a page shouldn’t have more that 100 links. Though the 100-link limit has never been a penalty situation, it is recommended you keep the number of the links on a page under 100. It is a good practice example, it doesn’t mean to avoid SEO. The pages with more than 100 links won’t be penalized or de-indexed. Instead, Google starts to ignore links after a certain point, and the links that pass the 100-barrier won’t pass domain authority. Does the Homepage have more than 100 outgoing links? Consider cutting down. Also, take note that pages with more internal links pointing to them are considered to be more valuable in a website by search engines. Try linking to the important ones more often, but keep it relevant.
Download The Website Redesign SEO Checklist
18. Prepare an Old and a New Sitemap
If you completely changed domains, it’s recommended to submit both the old sitemap and an updated one to the Search Console immediately after you redesign your website, so that Google can easily identify the redirects. You will help search engines to crawl and index your website faster.
19. Check Mobile Compatibility
A website that is mobile compatible means that it is an HTML based website that does not contain Flash content, and it adjusts the width of its elements to the width of the screen it is displayed on. If your site looks exactly the same on mobile as it does on a desktop, and you have to scroll left and right to view parts of the page, then it’s most probably not optimized for mobile devices. Use the Mobile-Friendly Test by Google to see if your site meets the requirement. If you see a result similar with the one from the next picture, you are safe.
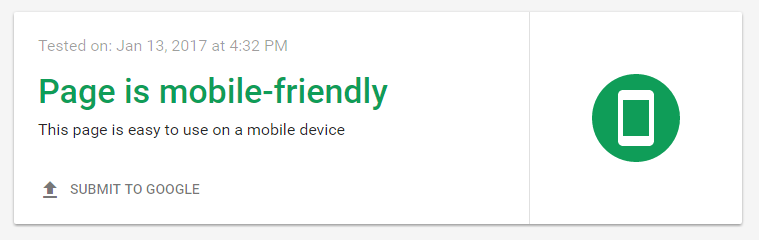
If not, you need to make your website mobile compatible.
20. Check PageSpeed Insights
The PageSpeed Insights is a tool created by Google to help webmasters to improve their website performance. The tool offers suggestions to make pages faster, by analyzing the content from the web page. You should use the PageSpeed Insights by Google to identify and fix as many errors as possible. Below you can example of the results for an analyzed website:
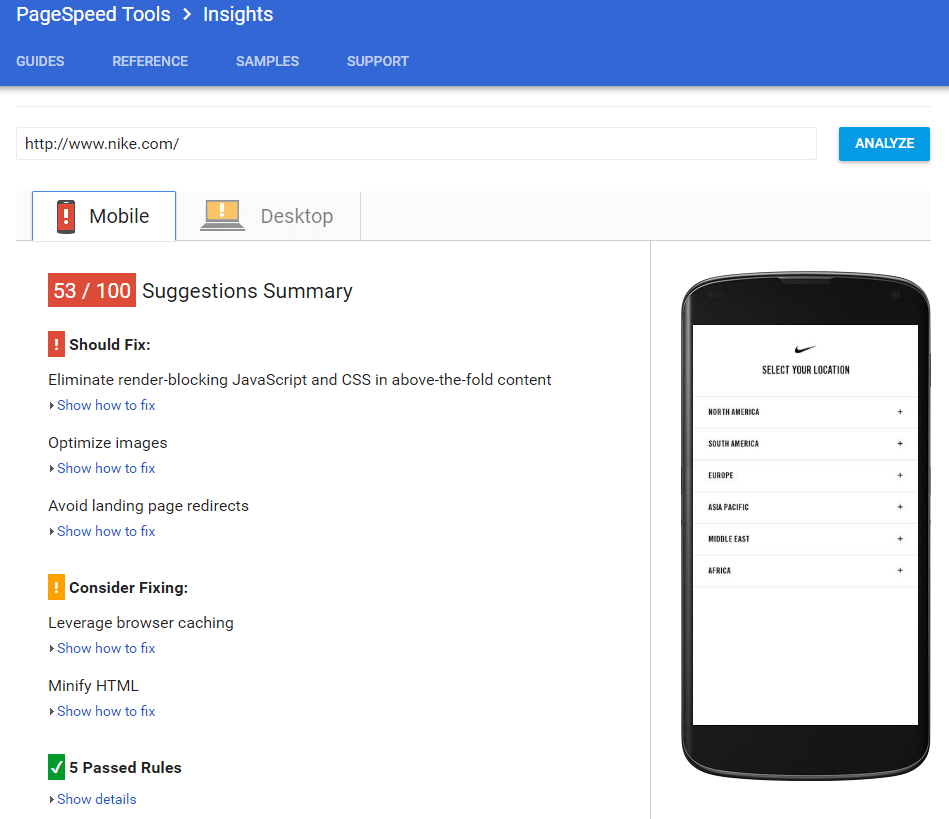
The tool gives a score out of 100 after it analyzes the content of a web page. You can find out more about how you can optimize your Google PageSpeed from this guide. There are some other tools that offers insights about the page load speed, like WooRank for instance.
21. Check Image Size
In many cases, redesigns include bigger, nicer images, which usually take a lot of space. If most of your images exceed 100kb, it will make your website load a lot more slowly. Also, it will take up your available hosting plan monthly traffic much more quickly. Remember that all images should contain a descriptive alt tag. There are numerous ways to compress your images. You can use online tools to compress the pictures before you upload them to your site. Or you can install a plugin on your website if you’re using a CMS platform, such as WordPress or Blogger. The beautiful part of the plugin is that you have the possibility to compress the pictures individually or in bulk.
22. Consider AMP and Instant Articles
AMP stands for Accelerated Mobile Pages. It is an elegant and a simple way to create a second version of your page, without all the extra stuff found on the desktop version. The AMP is recommended for web pages that don’t use custom JavaScript, and it’s mostly static. You can better optimize your website for mobile browsers and apps. On top of all, the web pages created using AMP will render fast. Instant articles is a mobile publishing format that enables news publishers to deliver interactive content. Facebook instant articles will preload the websites in the background on the Facebook app, so when users click a link, the site appears to be loading instantly. It will give you a peak advantage over your competitors on mobile browsers and the Facebook app. This is a bigger step, and it requires a larger amount of time to implement.
23. Check Microdata Implementation (or Consider Adding It)
Microdata is more useful for an eCommerce or a recipes website, but it’s also useful to have it on all types of websites. There is currently no way of mass testing this as Google doesn’t provide any API key for the tool, but you can check the format, and make sure it’s the same pattern on every page. You could implement your microdata by following the markup HTML available at schema.org. You will ensure high-quality user experience for those who view your ads. The microdata enables two shopping features, according to the Google Merchant Center Help:
- Automatic item updates;
- Google Sheets Merchant Center add-on.
24. Check Cookie Law
The cookie law is a piece of privacy legislation that requires visitors’ consent to store information on their browser. A cookie will save login information for you and offer you personalized webpages based on your behavior on a site. Below you will see an example of a cookie warning message:

Check if you have installed the cookie warning message. It should be clearly displayed at the top or bottom of the page, right as you enter the website.
25. Check Legal Compliance Pages
Internet laws are designed to protect the users. You don’t want to find yourself in breach of the regulations. The downside is you won’t be able to advertise if you don’t have legal pages. Google requires you to display legal pages for using its services such as Analytics’ software (as you can see in the picture below), Google AdSense, Google Adwords.

Terms of use, privacy policy, affiliate commissions disclosure are just a few examples of legal compliance pages.
26. Check Contact and About Pages
NAP citations (Name, Address, Phone Number) must be correctly displayed on your site. Besides the fact that having NAP citations on your website shows your business is legitimate, it will help you for local SEO optimization. You can also add microdata to the NAP format for an even greater impact. Make sure your contact forms are working, and the about page is present. You will, therefore, avoid any manual penalties. The lack of a contact page with an address, a functional contact form, and a phone number is a warning sign for manual reviewers.
Download The Website Redesign SEO Checklist
27. Check the 404 Page
Google recommends you to create a useful 404 page. If the visitors get lost sometimes or access links that are no longer available they will see a 404 error message. You should use that situation as an opportunity on your redirect strategy and redirect them to another page in your website. Otherwise, you risk losing them. A personalized 404 page can minimize the bounce rate. An example of a customized 404 page can be seen in the next picture:

Create a good looking 404 page. There are many options. Funny, professional, or even lead capture 404 page.
28. Remove Meta Keywords
Google and Yahoo do not use meta keywords as a ranking factor anymore. Google has declared them obsolete for ranking purposes since 2009. Bing, on the other side, penalizes your website if you stuff meta keywords. You could lose your rankings because Bing sees it as a spam signal. You may use them on eCommerce websites for internal search purposes (Google Search Appliance), but otherwise, you can just remove them, as they won’t be of much use.
29. Share Buttons
Social share buttons are important for your social media strategy as they play an important role in driving traffic to the site. They could easily increase awareness and boost your posts. The good news is that they are extremely versatile and can be incorporated in different unique ways. You could place them on top of your article, on the left or right side or at the bottom of the post. It’s entirely your decision. You can choose where to place them depending on your website’s design (or your web designer’s preferences), but actual references show the placement is vital. Maybe the most effective social buttons are those which allow readers to pin images as they go. If they are placed at the bottom, some readers will never make it there and may never see the share buttons. You need to place them in a way that the user does not need to leave what he is reading.

Source: https://socialmediaweek.org/wp-content/blogs.dir/1/files/social-sharing-buttons.jpg
Make sure your content can be shared very easily on the social media platforms most suited for your niche. You can promote your content and reach your audience quickly.
30. Subscribe Buttons
Can users easily subscribe to your posts on your blog? How about your top pages or any other landing pages? Having subscribe buttons is a significant way to create leads. Make sure the buttons work. Otherwise, you will lose your subscribers, and there could be some that you can reach only by email. Check your subscribe buttons and make a test to be sure everything works smoothly.
LAUNCH
31. Visually Inspect (Test) Your New Site
When you design a website, you need to think about accessibility. Is your site accessible to a color blind person? Are all of your scripts cooperating? If you visually inspect your new site, you will spot mistakes such as wrong spacing, different fonts, wrong color, wrong image width and so on. Adobe Dreamweaver CC has a tool that you can use to test functionalities on your site and get a full report on any errors that it may find. Visually inspecting your new site is an essential step you’ve probably done it at least ten times already. Now do it again!
32. Get a Warning Message Ready
“Coming soon” messages are used for various types of sites and industries. When launching a site, there are lots of aspects you need to test and verify; getting a warning message ready is one them. You wouldn’t want to lose your visitors because they can’t access your site and don’t understand why, would you? Below you can see an example of a coming soon design with a counter:

There are lots of ways to create beautiful “coming soon” messages on your landing page. Another example you can see below:
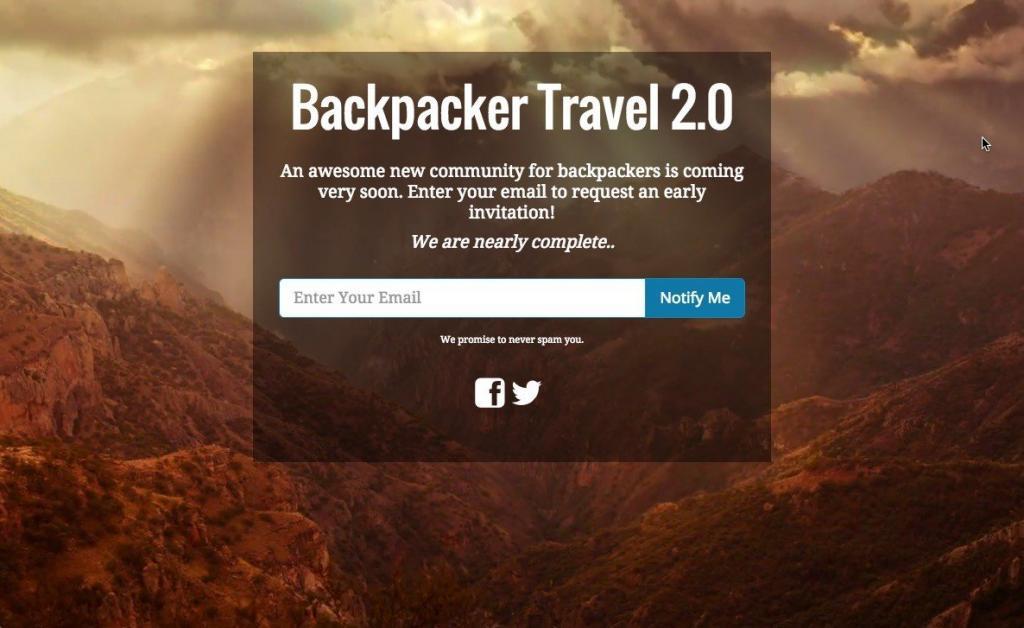 Just in case something goes wrong and your website launch takes longer than expected, you should have a warning message ready to let your users know you’re redesigning the website for a better experience.
33. Set Up a Monitoring Plan
To see where you stand and to set up objectives you need to have a monitoring plan. Would you like to know which are the most visited pages? What are the best driving traffic sources? Set your metrics and keep tracking them in order to see the improvements you’re making. Use the cognitiveSEO tool to monitor the website’s rankings. Use Analytics to monitor and see if and where the traffic drops or increases, and what your bounce rates have to say. Use Facebook Insights or Twitter Analytics to see the performance you have on those social media platforms.
34. Tracking Codes Placement/Remplacement
To keep tracking metrics and statistical data, you need to connect your new site with different services such as Search Console, Tag Manager, Analytics, Bing Webmaster Tools. You can install the Tag Assistant in your browser to see if you placed your codes correctly on your site. Insert the third party tracking software codes. Consider upgrading to Google Tag Manager and Universal Analytics. The most important tracking codes you need to place on your website are:
- Search Console: Follow the guidelines you will find in the tool to place the code on your site to receive data in the tool.
- Analytics/Tag Manager: Set up and verify Analytics. After you created the account, you need to wait up to 24 hours for data to appear in your reports. We recommend using Google Tag Manager and Universal Analytics instead.
- Bing Webmaster Tools: There are three ways to install the code and fewer steps to register your site with Bing, as compared to Google.
35. Set Analytics Goals
You can see maximum 20 goals per reporting view. If you want to track more, you need to create another view for that property. You can’t delete a goal, but you can stop it from tracking. You can create a goal as a contact form, a request for an offer, a subscription for a product, a subscription to the newsletter, downloads, video plays and purchases. It’s a good thing to have goals because you can track your ROI. In the next picture you can see how to set up your goals:
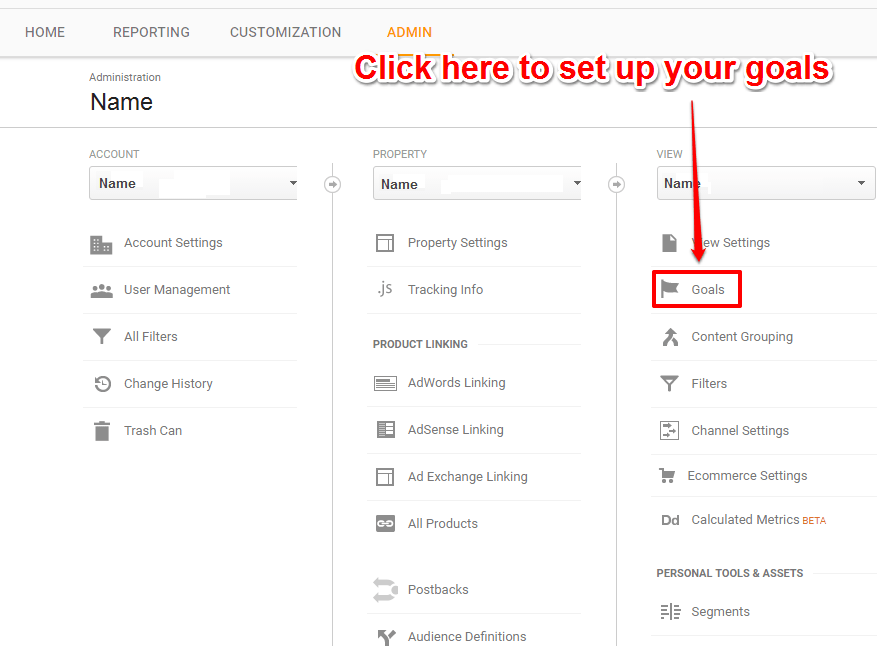
Set the new goals for the website, add to cart, purchase, etc. You need to do this now to ensure the tracking starts as soon as the site is live.
36. The Time You Launch
Before you take any decision, you need to think about your audience. When is your site getting the most traffic? Avoid launching the new web design at the peak hours. Preferably launch it after midnight, in the time zone where most of you traffic comes from. Also, launch it when you’re sure you’ve tested the elements on the website.
37. Post the New Version
You’ve made it so far. Take a deep breath. The site speed is good, you are in Google’s index and grace; you have everything set up from ALT text to redirects. Yet, once you’ve used local installation, a subfolder, a subdomain or an entire domain for your test site, you need to start moving the site to the live version. Consider breaking it into smaller steps/sections if the website is very large.
38. Remove Password
Don’t forget to remove the password you’ve set for the development version of the website in the pre launch phase for a correct SEO website redesign. This will allow users and crawlers to access your new website.
Download The Website Redesign SEO Checklist
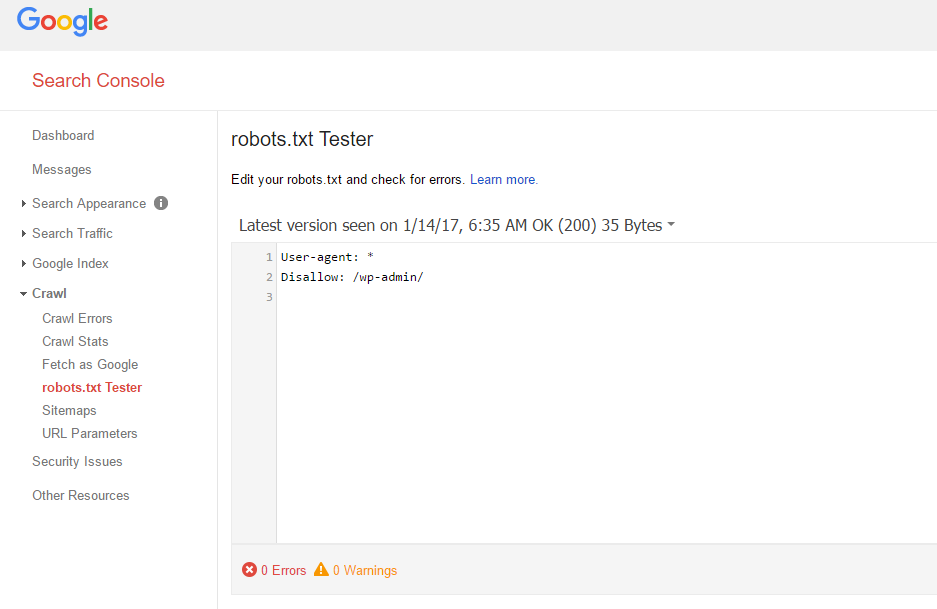
39. Check Robots.txt
Update and check the robots.txt file to make sure it blocks the parts you don’t want to be crawled and that it doesn’t block search engine spiders from crawling important pages on your website. You can test your robots.txt with the robots.txt Tester by Google. Choose a verified property from Search Console. Then you will be redirected to your account to see if there are errors or warnings. In case you don’t have errors, the dashboard will look similar to the one from the next picture:
40. Set up the 301 Redirects (Without Domain Change)
You don’t want to lose all the traffic from the old domain, do you? Migrating site without using redirects is a big SEO mistake. Make sure you set up all the 301 redirects from the old URLs to the new ones. There are a few things you need to check before you finish this step:
- Place the 301 redirect codes: Set the 301 redirect to each modified URL to point exactly to the new version of it. This way, any old URL that you forgot to update will be redirected.
- Submit sitemap XML to Google: Submit the new Sitemap to the Search Console so that Google updates the pages. It will automatically identify the redirects. Any traffic you will be getting from Search Engines to the old link will be redirected as well. Google will probably identify the new URLs without the sitemap, but by submitting it, you will help to speed up the process.
- Submit sitemap to Bing: Just as you submitted the sitemap to Google, you should submit it to Bing Webmaster Tools.
- Check orphan pages 404: Deleted pages should return a 404 error message. Make sure orphaned URLs correctly return a 404 or a 410 error response code. If not, fix them. A good practice on this matter is to personalize a 404 page to be in harmony with the whole site/brand.
- Check relevancy: When you have an entirely new domain, you should also verify the information from each redirected URL. The old unused URLs must be redirected to relevant locations. If you have pages on the new site that are similar to some of the old site, it is simpler to make the redirect. In case you don’t have something similar you should redirect the old URLs to homepage, instead of a 404 page. Never redirect to irrelevant locations.
- Keep the redirects: Try to keep the redirects for as long as possible, and consider keeping them forever. You can’t be sure when Google’s Crawler finishes the job.
41. Set Up the 301 Redirects (with Domain Change)
If you completely changed your website and won’t be using the same domain, you should redirect the root domain, and each page accordingly. Check the next steps to be sure you’ve set up the 301 redirects correctly:
- Set up the redirect codes: Set up server-side redirects (301-redirect directives) from your old URLs to the new ones. The change of address tool won’t function properly without this.
- WWW or non-WWW: Verify the preferred version of your new domain (www vs. non-www). If you have checked http://example.com but instead want to use http://www.example.com, it will not appear in the list until you verify it.
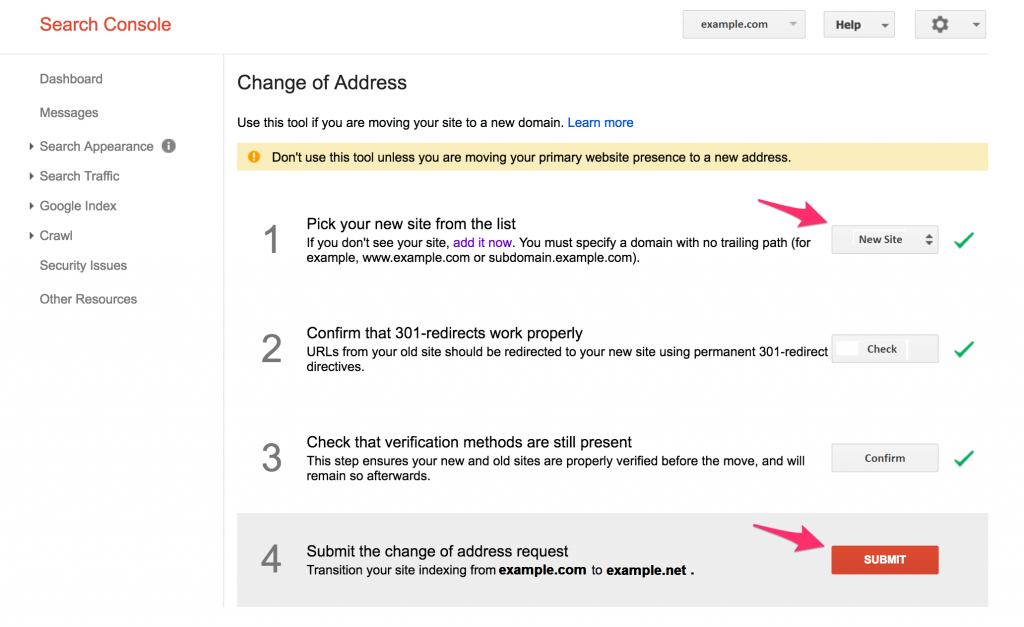
- Submit a change of address: Submit a Change of Address in the Search Console for the old website (in the old site Search Console, click the gear icon top right). The Change of Address Tool won’t work if you haven’t set the 301 redirects properly. You can see in the next picture what are the steps you need to follow to do this:
- Submit sitemaps to Google: Submit both the old and the new Sitemaps previously prepared to the Search Console (on the destination/new site Search Console). In the tool, you will see all the submitted sitemaps and the sitemaps you’ve submitted (as displayed in the next screenshot)
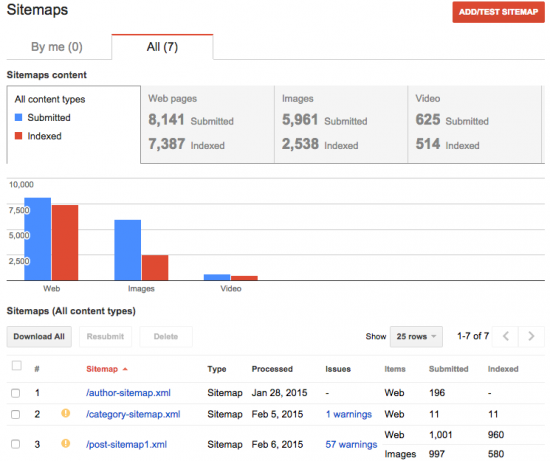
Source: https://yoast-mercury.s3.amazonaws.com/uploads/2015/02/gwt-sitemaps-listing-550×461.png
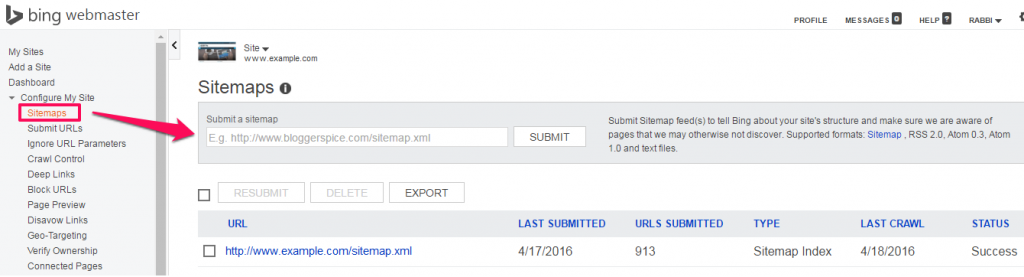
- Submit sitemap to Bing: Submit the new sitemap to Bing Webmaster Tools. Look at the next screenshot to see where to submit the file in Bing Webmaster Tools:
- Check for broken links: Check for broken links (internal links, file attachments and images). Use Screaming Frog SEO spider for this. Download the software for free in the lite form.
- Check for broken CSS/JS: Check for broken CSS and JS file URLs.
- Keep the redirects: Try to keep the redirects for as long as possible, and consider keeping them forever. You will need ownership of the old domain as well. Selling it means compromising all the old backlinks, unless you manually reach to each and every webmaster, asking them to replace the old domain with the new domain.
42. Review Search Console Settings
Search Console is a great tool to use for your website. Set up or update all the new configurations in the Search Console. To finish this step, you should take the next actions:
- Set URL Parameters: Use URL parameters to remove any unwanted duplicate links from the search engine created by search parameters such as “/?term=searchterm”. You should be able to find these parameters in the crawl. If you already blocked them from robots.txt or other PHP rules, then they won’t be crawled.
If you see this message in Search Console you are safe: “Currently GoogleBot is not experiencing problems with coverage of your site, so you don’t need to configure URL parameters.” Maile Ohye, a member of Google’s webmaster support team, explains in the next video how to configure URL Parameters in Google Webmaster Tools.
- Set Geotargeting: Set up International Targeting so that you can target specific countries if you wish to do so. For that, you need to place the hreflang tags on your site. If you instead are doing the redesign and plan to target a global audience, select Unlisted in the drop-down list of the Site Settings page.
The hreflang tags are important, and they allow you to designate the language version for a particular market. In the next video, Bill Hunt, the President of Back Azimuth Consulting explains how to use hreflang correctly. For example, if you have a multilingual site, the tag tells the search engines which version of your website to display based on the country of the user.
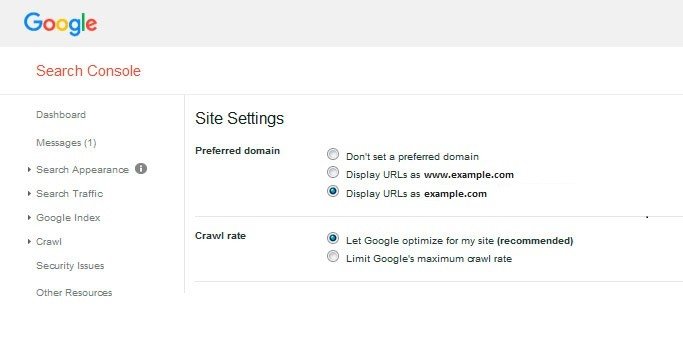
- Check crawl limits: Make sure there are no crawl limits so that Googlebot can freely crawl all your URLs. As you can see in the next picture, you have to check the “Let Google optimize for my site” instead of “limit Google’s maximum crawl rate”.
43. Disavow Files
There are numerous situations when you need to upload the disavow file. In case you’ve uploaded a disavow file to the old site, you need to upload it to the new site. Also, if you have purchased a new domain and found out its link profile is spammy, upload the disavow file generated previously in the Pre launch section. With the CognitiveSEO you can send the file right from the tool and evaluate each link.
44. Reindex Site from Search Console
What you probably want now is to be indexed by Google and have all your organic traffic and SEO rankings in a safe place. And since you changed your domain you should reindex it. You can do that from your Search Console account. Go to Menu at Crawl > Fetch as Google, enter the domain and click fetch. After the site is found, click on Request Indexing. Check the captcha and click Go. Below you have a screenshot from the tool:

45. Annotate the Site Launch in Google Analytics
Use annotations in the Google Analytics to mark the website redesign launch. This way you can easily remember in the future when the redesign took place. In the next picture, you will see how to add annotation in Google Analytics on any report you’d like to display information based on the big change on your website.
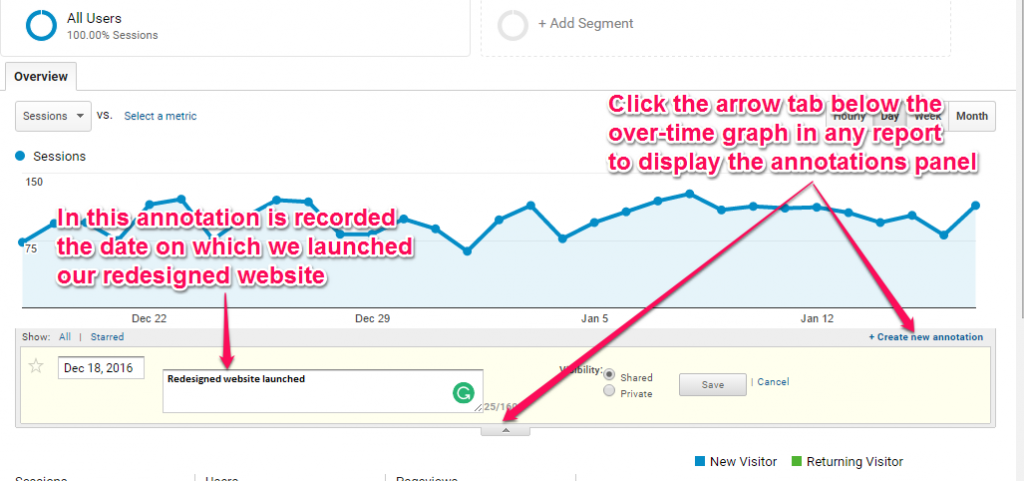
The example above is a site with a new design. Choose the date for when you launched your new website and started tracking the data.
POST-LAUNCH
46. Check Search Console Errors
Verify the messages from Search Console to see if you received something new. Check each section of the menu and see if everything is ok, if you have errors or any other warnings you need to take care of. It is recommended to make an overview after you launch your site because you might find errors that hadn’t appeared until then. Watch them and fix them as they come out.
47. Crawl the New Site and Audit It
A couple of months in, crawl the new site to see if you fixed all the issues. Just like in the pre-launch phase, you need to make an audit for your new site. Use tools like cognitiveSEO or, Moz, Woorank and even Google Search Console to generate substantial data. Good luck in the next steps in your SEO website redesign!
48. Compare the Results
After the website audit, you should compare the number of indexed links, and the results. The number of pages crawled should be identical to the old site, considering you haven’t deleted or added any content. Look for any unfixed errors such as missing titles, descriptions, alt tags, etc.
49. Check Your Server Logs
Check your server logs to identify broken pages. You can easily spot traffic that flows to 404 pages. To verify if you have server logs errors on your website you need to open your web browser and connect to your hosting account’s cPanel, then scroll down the page until you locate the “Logs” section. Check the “Error Log” icon and see the error messages.
Download The Website Redesign SEO Checklist
50. Update Social Media Website URL
If you changed your domain, you should quickly update your website’s new link in the short description section about your business on social media. You can also try to redirect some of your most popular posts if they are still getting likes/shares/views.
51. Match Social Media Designs with the Website
Consider redesigning your social media covers and profile pictures, so they match the new website. If any of your followers accesses the internet site through your social media, they expect to see something similar. This might affect bounce rate. You can change the profile picture and top banner or custom welcome page (if you have something like that) to correspond to the new design of your website. This rule applies to the ads design and other images you use on social media, as well.
52. Monitor Your Website Thoroughly
For the next two months at least, monitor your website. Notice if you see improvements in the bounce rate, conversion rate, and time spent on the website. Test elements on your site, check links, check pages, the subscription form. If you have an e-commerce website, you need to see if the ordering and payment process work smoothly.
53. Check Number of Pages Indexed
You can type site:yourdomain.com in Google to see how many of your URLs have been indexed. Below you can see an example:
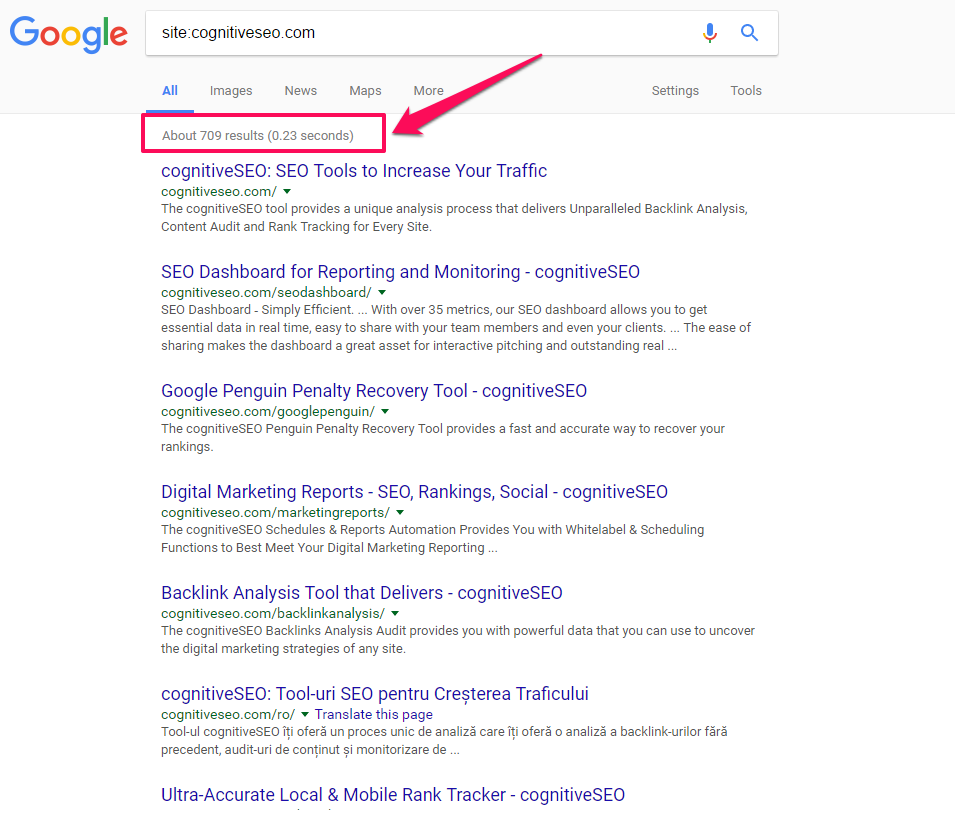
The number of results you see in Google is pretty accurate.
54. Make Sure All Wanted Pages Are Indexable
Check to see if there are any particular noindex settings on important pages using the crawl you did. If you have the noindex tag on your pages, it will block search engine web crawlers from indexing a page on your site. The tag is placed in the section and it looks like this: ![]() or
or ![]()
55. Monitor the Cache Date of Indexed URLs
Use the cache:yourdomain.com operator to find this information. You will see a version of your site. If the cache data is frequently updated, it means that Googlebot likes your website. If the cache date is very old, there might be indexing problems. Make sure you did all the steps in the previous sections.
56. Clean Up New Domain
If you found in the pre-launch checklist that the new domain has unwanted backlinks from the previous owner, consider manually cleaning them. It is a process that will take you some time, but if you really want that domain, you must clean off all the unnatural links because they will harm your site. Sign in the cognitiveSEO tool to verify your backlink profile and spot the links.
57. Update Backlinks
If you went through URL changes or changed your domain, consider replacing some of the most important backlinks from pointing to the old URL/domain, to pointing to the new URL/domain. The 301 redirects will still pass the link value, but updating them will help you to monitor your backlinks more easily in the future. To do this, you can use the list generated by the cognitiveSEO Tool in the pre-launch checklist.
58. Check and Compare Search Traffic
How much search traffic do you have compared with the previous version of your site? Use your Analytics and Search Console data to compare the results. In case you changed the domain, it is mandatory to have the data exported in the pre-launch phase into a CVS file and compare it with the data you have now. In case you didn’t change your domain you can compare your data straight from Google Analytics. See the picture below to understand how:
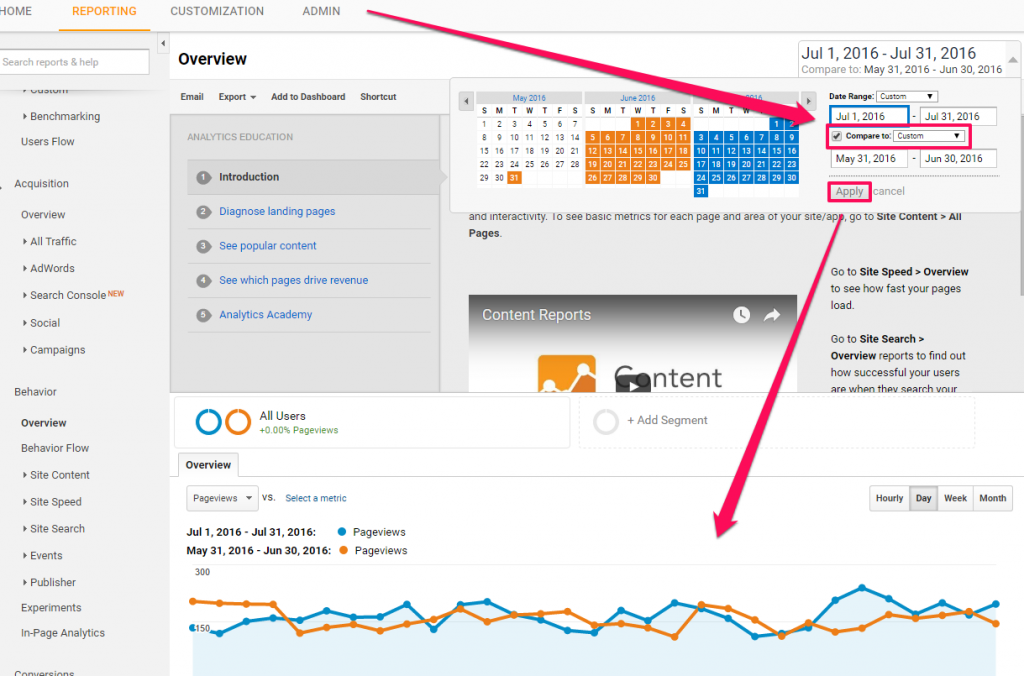
Select a period before the launch and then select a period after the launch to see the differences. You can compare data in Search Console, too. See the next screenshot to understand where you can choose the option to compare data:
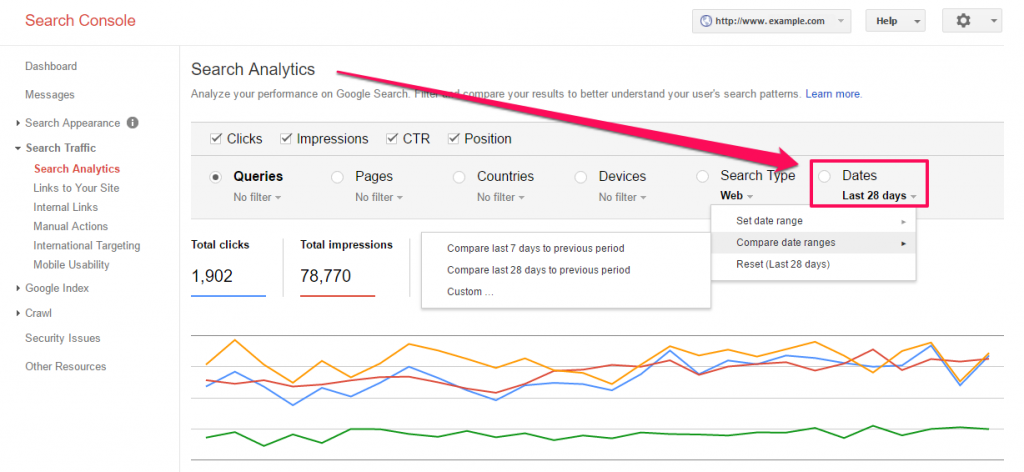
You can choose to compare the data for any period you’d like.
59. Compare Your SEO Visibility
Check your SEO Visibility for drops or gains. Use the cognitiveSEO tool to monitor your SEO Visibility evolution. Below you have a screenshot from the tool with the SEO visibility graph:
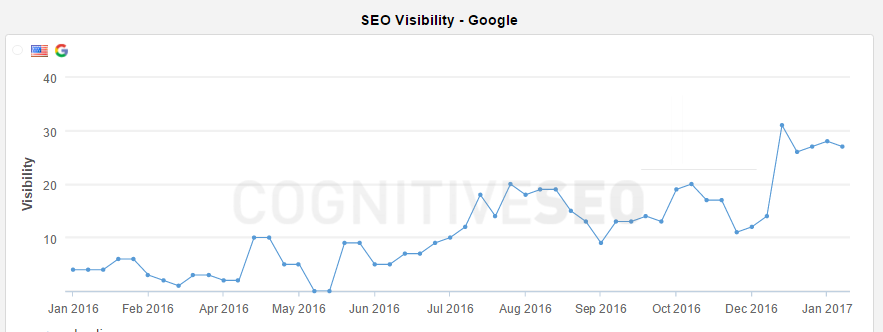
This metric helps you to easily identify market trends and digital marketing strategies, regardless if they are part of some marketing automation approach or any other. The SEO visibility is calculated based on millions of keywords that are tracked in Google, their importance and traffic volume and all the ups and downs can be easily correlated with Google’s algorithms updates.
Conclusion
You need to bear in mind that redesigning your website is a big move and it is more than just changing a few colors. It implies a whole sort of technicalities, from domain names, duplicated content, xml sitemap, Google algorithms, redirects chains, thin content, speed and performance to most common seo mistakes like h1 tags or title and meta description.
You should always save the data before the big website redesign launch and after to compare and spot the eventual major SEO errors. And even if your website goes live and everything is a great SEO success, before drinking from the victory champagne, take another look to make sure that everything is OK and that your “newly” existing site doesn’t lose search engine rankings.
At the end of the day, we all know it’s not about just the search engine optimization, Google and Bing and their algorithms. A proper redesign or migration should be made for the aspiration of all business: the users’satisfaction. At the end we all know it’s not about just the search engine optimization, Google and Bing and their algorithms. A proper redesign or migration should be made for the final aspiration of all business: the users’satisfaction. And to provide the best results for your users, we warmly recommend you downloading the complete website redesign checklist and, when it’s the case, use some SEO tools to help you out. This website redesign checklist is not a beginner’s guide, yet, it can easily be used by people from the industry, from nubs to SEO pros or anyone who doesn’t want their SEO traffic dropped. The website redesign SEO checklist includes three major phases: before you launch the new site, the moments while you are updating your website and the monitoring steps afterwards.
Download The Website Redesign SEO Checklist


Really great content Andreea!
This is not for beginners but i think if we follow the steps we won’t lose any SEO rankings.
You’re right Asi this is not really for beginners. But this list can easily be shared with whoever takes care of your site. They will understand it better. It can also be a good learning process, if you don’t know about something, research a little about it. I would not recommend skipping any steps though !
Just wow! I really appreciate cognitive hard word. I didnt read all of the MEGA ARTICLE but thank you for this. The excel is just marvoulous, a cherry on the top.
Thank you for your hardwork. 🙂
Wow, that is an extremely comprehensive checklist! I have come across a few of these before and they all include a two step process, pre-launch and post-launch. I like how you have added a third phase in between the two. It makes a lot of sense as there are things that need to be execute in the shortest possible time while you migrate to the new SEO structure.
Thanks for sharing
Yes Marko, you’re right, it’s all about that short moment. There’s a lot of upfront planning and work, but the real merge happens relatively quickly.
Really happy that you found it helpful. Indeed there are important things in between the pre-launch and post-launch that need attention.
Thanks Andreea for your detail discussion. It’s definitely worthy while anyone thinking to redesign their website for better UI/UX. I think you can share a little bit more about .htaccess through anyone can rewrite or redirect URL structure which is majorly possible to change while redesigning a website.
But i like the your content flow. Its short and crispy with all steps by steps process which will definitely help the new webmasters.
Thank you for the input. We might talk about the .htaccess more on a future post!
LOVE this article.
Trying to design a website is hard enough let alone redesigning it. Even though this article was very long, i appreciate how in-depth it was and the takeaways I’ve got from it.
thanks Andreea, keep it up.
Thank you for the appreciation, Tahir. Glad to hear you found it relevant!
Hi Andreea!
Thanks for the complete guide for the website redesign project.
Before initiating a redesign project, clients needs to justify the need to redesign the existing website. And sole reasons should be to improve the performance. It is easier said. The majority of the clients wants to redesign the website because they find website too old, design is not “contemporary” and other such flimsy reasons.
Web redesign is a risky business, if not handle properly. Your article will help to make checklist to achieve more result from the new website.
Well pointed! Yet, when redesigning your website, regardless of the reasons, all the steps mentioned in the article must be taken into consideration.
I did a migration from http to https and I lost enough rankings, the truth that applying some of these points I think the same would not have happened, I will take them into account without any doubt, and thanks for the download of check list, I will be very well
Glad you found the guide useful. Good luck with everything! Hope you get your ranks back.
This addresses an all too common SEO issue that people often face when going through a redesign. Extremely valuable post Andreea, thanks for sharing!
Thanks Andreea for your detail discussion. It’s definitely worthy while anyone thinking to redesign their website for better UI/UX. I think you can share a little bit more about .htaccess through anyone can rewrite or redirect URL structure which is majorly possible to change while redesigning a website.
But i like the your content flow. Its short and crispy with all steps by steps process which will definitely help the new webmasters.
You there, this is really good post here. Thanks for taking the time to post such valuable information. Quality content is what always gets the visitors coming.
The article is very helpful. My website shows very old cache date. Please suggest
Real beautiful Article, Thanks for sharing!