 Site Explorer
 Keyword tool
 Google Algorithm Changes
While technical SEO is a topic that only some of us make use of rigorously, it is a part of everybody’s life. Well, which part of SEO is not technical if we were to look at it thoroughly?
SEO issues, mistakes, tips and recommendations are all included in today’s technical checklist. We wanted to cover, in the most effective way possible, all the elements that are important for making your website user-friendly, efficient, visible in SERP, functional and easy to understand. Therefore, gather all the information you have on your site and let’s get better.

- Improve Server Response Time
- Optimize & Reduce Image Size Without Affecting the Visual Appearance
- Minimize the Render-Blocking Javascript and CSS
- Limit the Number of Resources & HTTP Requests
- Set a Browser Cache Policy
- Reduce the Number of Redirects & Eliminate Redirect Loop
- Avoid Loading Your Site With Too Much Stuff
II. Website Functionality & Usability
- Make Sure Your Website Is Mobile Friendly
- Build Search Engine Friendly URLs
- Use the Secure Protocol – HTTPs
- Set Preferred Version
- Set up Correctly the 301 Redirects After Site Migration
- Make Sure Your Resources Are Crawlable
- Test Your Robots.Txt File to Show Google the Right Content
- Verify the Indexed Content
- Review Your Sitemap to Avoid Being Outdated
- Review Blocked Resources (Hashbang URLs) with Fetch as Google
- Optimize Your Crawl Budget
- Avoid Meta Refresh for Moving a Site
- Use Redirect for Flash Site to the HTML Version
- Use Hreflang for Language and Regional URLs
- Make Sure Your Tracking Is Working Properly
- Redirect/Replace Broken Links & Resources
- Audit Internal Links to Improve Your Chances to Rank Higher
- Get Rid of Duplicate Content
- Use Structured Data to Highlight Your Content
- Keep a Reasonable Number of Links On-Page
- Avoid Canonicalizing Blog Pages to the Root of the Blog
- Set up Your AMP the Right Way – Mobile Friendlier
- Add Breadcrumbs for a Better Navigation
- Test On as Many Platforms and Devices as Possible
V. Auditing Your Brand Signals for AI Visibility
I. Website Loading Speed Time
On the web, time is of the essence. Websites all around the world load pretty slow, with an average of 19 seconds to load on a 3G mobile network. Testing has confirmed that around 50% of users abandon a website if it doesn’t load faster than 3 seconds, on average.
If your website loads slowly, you can lose a lot of visitors.
Disclaimer & Warning: Playing with PHP, servers, databases, compression, minification and other similar things can really mess up your website if you don’t know what you’re doing. Make sure you have a proper backup of the files and the database before you start playing with these options.
When we talk about speed, there are a few things we need to consider for making your site efficient and easy to access for your users. A faster loading speed time means higher conversion and lower bounce rates. For that, we’ve selected some mandatory speed optimization suggestions. Using Google’s Speed Test, you can perform easy and short analyses of your website’s loading speed time.

The tool has improved over the years and now you can see helpful charts for large websites to understand how each website is performing. One example is the Page Load Distributions.
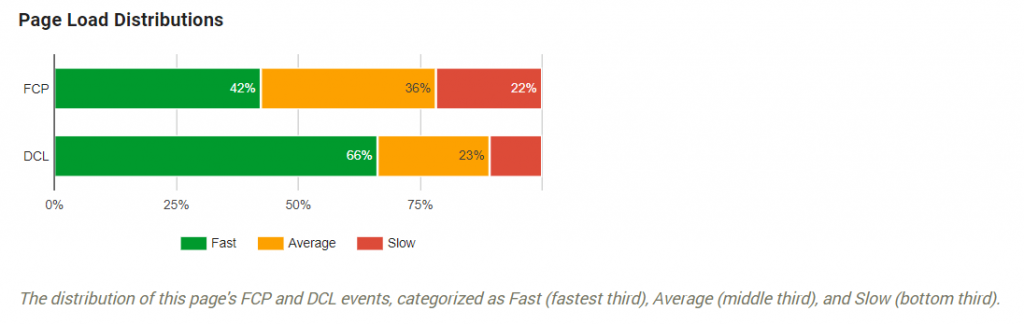
The Page Load Distribution uses two user-centric performance metrics: first, contentful paint (FCP) and DOMContentLoaded (DCL). The contentful paint marks the first bit of content there is on the screen when the browser starts to render pixels. The DOMContentLoaded marks the moment when the DOM is ready and there are no stylesheets that are blocking JavaScript execution. These two metrics show exactly which percentage of the content loads faster and the one that needs improvement by looking at those pages with average and slow speed (if you follow the chart).
Another example includes the speed and optimization indicators which show where each website is situated. In the picture showed below, we can see the FCP and DCP score. These two metrics use the data from the Chrome User Experience. It indicates the page’s median FCP (1.8s) and DCL (1.6s) ranks it in the middle third of all pages. That means this page has a low level of optimization because most of its resources are render-blocking.

1. Improve Server Response Time
Server response time refers to the period of time it takes to load the HTML code to begin rendering the page from your server. Basicaly, when a you access a page, it sends a message to the server and the time it take to show you that information is considered to be the server response time.
There are lots of reasons why a website has a slow response time. Google announces just some of them:
| There are dozens of potential factors which may slow down the response of your server: slow application logic, slow database queries, slow routing, frameworks, libraries, resource CPU starvation, or memory starvation. | |
| Google Developers | |
The server response time depends on how much time the Googlebot needs to access the data. Be it 1, 2 ,3 seconds or more, it will convert your visitor or not. Google says that you should keep the server response time under 200ms.
There are 3 steps you need to follow to test and improve the server response time:
- Firstly, you need to collect the data and inspect why the server response time is high.
- Secondly, measure your server response time to identify and fix any future performance bottlenecks.
- Lastly, monitor any regression.
Many times, the reason why a website loads slow is the server itself. It’s very important to choose a high quality server from the beginning. Moving a site from a server to another might sound easy in theory, but it can be accompanied by a series of possible problems such as file size limits, wrong PHP versions and so on.
Choosing the right server can be difficult because of pricing. If you’re a multinational corporation, you probably need dedicated servers, which are expensive. If you’re just starting out with a blog, shared hosting services will probably be enough, which are usually cheap.
However, there are good shared hosting servers and bad dedicated ones and vice versa. Just don’t go after the cheapest or the most renowned. For example, Hostgator has excellent shared hosting services for the US, but not so excellent VPS ones.
2. Optimize & Reduce Image Size Without Affecting the Visual Appearance
If a website is loading really slow, one of the first things that come in mind are images. Why? Because they’re big. And we’re not talking in size on screen but in size on disk.
Besides all the information an image has, as mentioned before, it also downloads lots of bytes on a page, making the server take more time than it should to load all the information. Instead, if we optimize the page, the server will perform faster because we removed the additional bytes and irrelevant data. The fewer the downloaded bytes by the browser, the faster a browser can download and render content on the screen.
Since GIF, PNG, and JPEG are the most used types of extension for a picture, there are lots of solutions for compressing images.

Source: www.cssscript.com
Here are a few tips and recommendations to optimize your images:
- Use PageSpeed Insights;
- Compress images automatically in bulk with dedicated tools (tinypng.com, compressor.io, optimizilla.com) and plugins (WP Smush, CW Image Optimizer, SEO Friendly Images) and so on;
- Use GIF and PNG formats because they are lossless. PNG is the desired format. The best compression ratio with a better visual quality can be achieved by PNG formats;
- Convert GIF to PNG if the image is not an animation;
- Remove transparency if all of the pixels are opaque for GIF and PNG;
- Reduce quality to 85% for JPEG formats; that way you reduce the file size and don’t visually affect the quality;
- Use progressive format for images over 10k bytes;
- Prefer vector formats because they are resolution and scale independent;
- Remove unnecessary image metadata (camera information and settings);
- Use the option to “Save for Web” from dedicated editing programs.
Source: www.quora.com
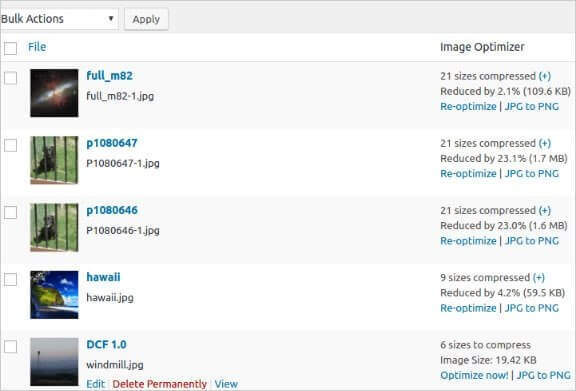
If you’re using WordPress, you can choose a simple solution, such as the Smush Image Compression Plugin.
Update: As of 2019, Google PageSpeed Insights recommends using new format images such as JPEG2000 or WEBP. However, not all browsers and devices display these formats well yet, so regular image compression is still recommended, despite Google making efforts to push this.
You can see which images are the biggest on your website with the Site Audit by CognitiveSEO. Simply head to the Images section, under Content. There you can see a list of images over 500kb (consider that for a photographer website, these images might be relatively small in size. However, it’s a good idea to display the full HD version under a sepparate download link).
The only real issue with PageSpeed Insights is that you can only check one page at a time.
We, here at CognitiveSEO, know that many of you want to check the PageSpeed Insights in bulk. So that’s why we’ve developed our tool to be able to bulk check the Page Speed Insights scores on multiple pages at the same time:
However, note that if you have a very big website, this process might take a very long time. It’s better if you opt out of this process at first before the first analysis is done (so that you may have all the data and start fixing some of the issues) and start the PageSpeed process later. It can take up to 10 seconds per page, so if you have 60,000 pages it can take a week.
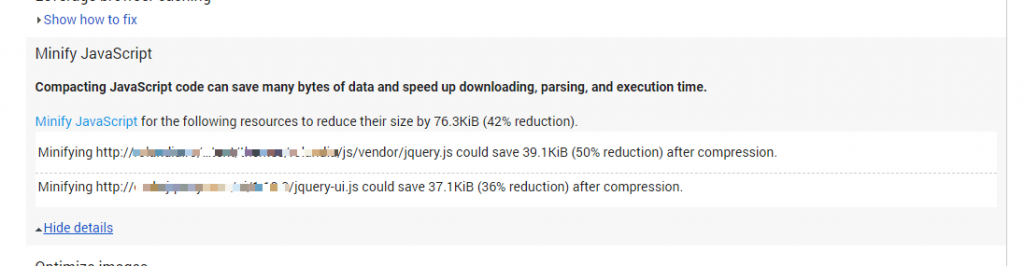
3. Minimize the Render-Blocking Javascript and CSS & Structure HTML Accordingly
When you perform a speed test with Google’s PageSpeed Insights, you will see this message: Eliminate render-blocking JavaScript and CSS in above-the-fold content in case you have some blocked resources that cause a delay in rendering your page. Besides pointing out the resources, the tool also offers some great technical SEO tips regarding:
- Removing render-blocking JavaScript;
- Optimizing CSS delivery.
You can remove render-blocking JavaScript by following Google’s guidelines and avoid or minimize the use of blocking JavaScript using three methods:
- Inline JavaScript;
- Make JavaScript Asynchronous;
- Defer loading of JavaScript.
If Google detects a page which delays the time to first render because it contains blocking external stylesheets, then you should optimize CSS delivery. In this case, you have two options:
- For small external CSS resources, it is recommended to inline a small CSS file and help the browser to render the page;
- For large CSS files, you have to use Prioritize Visible Content to reduce the size of the above-the-fold content, inline CSS necessary for rendering it and then defer loading the remaining style.
PageSpeed shows which files need to be optimized through the minifying technique. When we talk about resources, we understand HTML, CSS, and JavaScript resources. Basically, the tool will indicate a list of HTML resources, CSS resources, and JavaScript resources, depending on the situation. Below you can see an example of such kind:
For each kind of resources, you have individual options:
- HTMLMinifier to minify HTML;
- CSSNano and csso to minify CSS;
- UglifyJS to minify JavaScript.
Below you can see an example on how to minify your CSS:
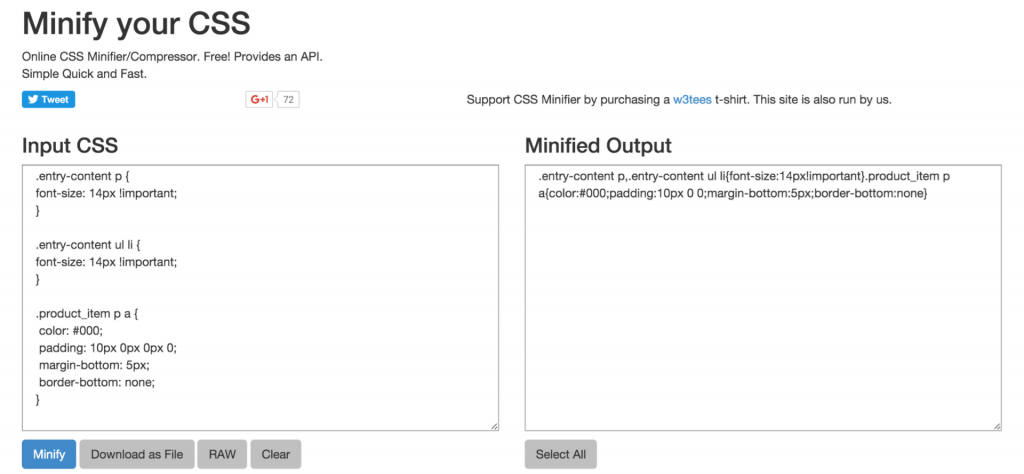
Source: www.keycdn.com
There are 3 processes that need to be followed in the minifying process, explained by Ilya Grigorik, Web performance engineer at Google:
- Compress the data. After you eliminate the unnecessary resources, you need to compress the ones that the browser needs to download. The process consists in reducing the size of the data to help the website load the content faster.
- Optimize the resources. Depending on what sort of information you want to provide on your site, make an inventory for your files and keep only the one that is relevant, to avoid keeping irrelevant data. After you decide which information is relevant to you, you’ll be able to see what kind of content-specific optimizations you’ll have to do.
Let’s take, for example, a photography website that needs to have pictures with a lot of information, such as camera settings, camera type, date, location, author and other information. That information is crucial for the particular website, while for another website it might be irrelevant.
- Gzip compression is best used for text-based data. In the process, you are able to compress web pages and style sheets before sending them to the browser. It works wonders for CSS files and HTML because these types of resources have a lot of repeated text and white spaces. The nice part of Gzip is that it temporarily replaces the similar strings within a text file to make the overall file size smaller.
For WordPress users there are simpler solutions:
- Autoptimize plugin to fix render blocking scripts and CSS. You need to install the plugin and afterward you can find it in Settings » Autoptimize to configure the settings. All you have to do is check the box for JavaScript and CSS, in our case, and click on Save Changes.
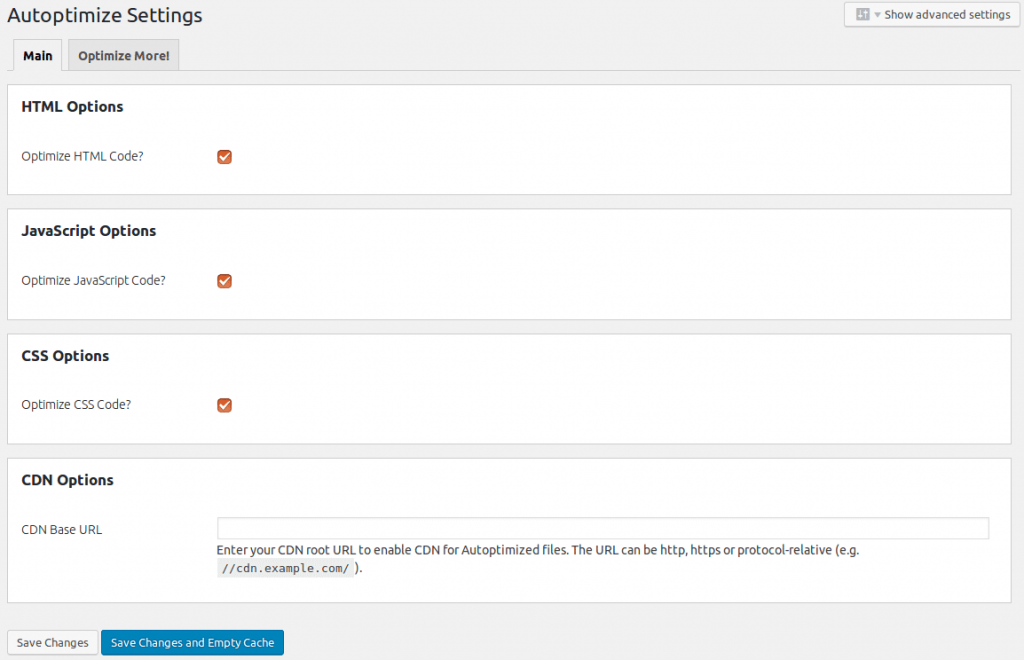
Source: www.webid-online.com
- W3 Total Cache to fix render-blocking JavaScript. This is another tool provided for WordPress users and it requires a little more work. After you install it, you need to go to Performance » General Settings and look for the Minify section.

Source: www.factoriadigital.com
Check the enable box from the Minify option and then in Manual mode. In the end, click on Save all settings and add the scripts and CSS that you want to minify. After that, you’re set.
However, don’t get tricked by Google. The truth is that PageSpeed Insights is just a guideline. For example, PageSpeed Insights shows Analytics and Tag Manager as being JS that blocks the loading of important content. Yet they force you to put it in the <head> section.
You can follow this guide to better set up the W3 Total Cache Plugin.
Never remove something that is essential for tracking or for your site’s functionality just to get 100% score on PageSpeed Insights or GT Metrix.
4. Limit the Number of Resources & HTTP Requests
One of the first actions that come to mind when we talk about website speed is reducing the number of resources. When a user enters your website, a call is made to the server to access the requested files. The larger those files are, the longer it will take to respond to the requested action.
Rapid, multiple requests always slow down a server. It’s a combination of multiple factors that lead to this, but you can compare it to copying 1 large file on a hard disk against copying a very large number of small files. Usually, the small files take longer to copy because the disk needle has to keep moving. This is different with SSD technology where there are no needles but there’s still a lot more work to do to copy multiple files than to copy a single larger file.
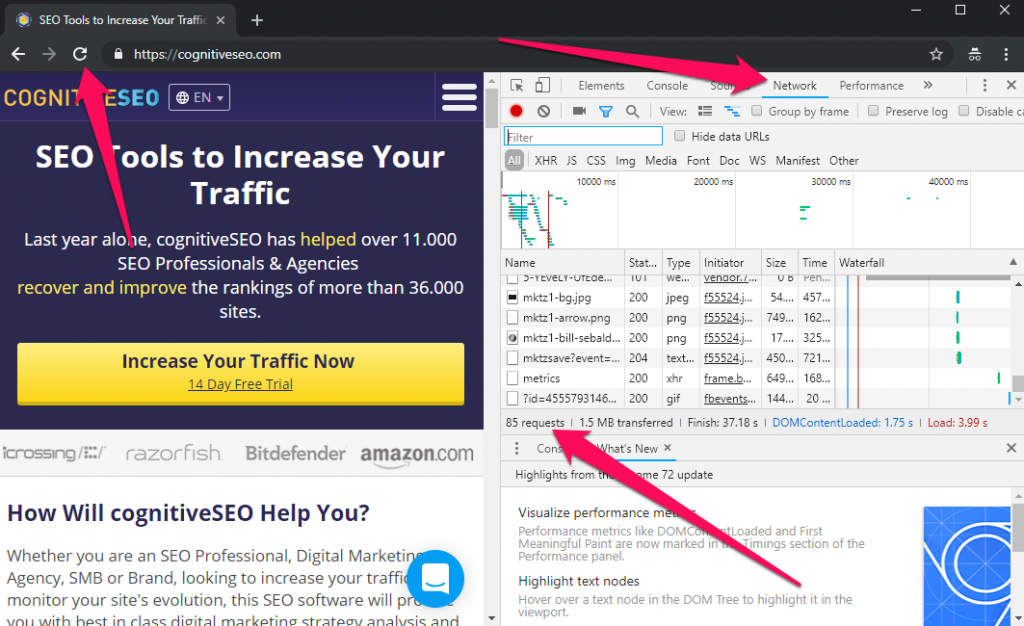
To check your HTTP requests, you can open an Icognito (to make sure you don’t have cached requests which won’t take place) Tab in Chrome, right click and hit Inspect (at the bottom). Then you need to find the network subtab and hit F5 to refresh the page. This will start monitoring the requests and at the end you’ll see the number of requests.
There’s no general number, we can say that you should try to keep this number under 100. This really depends on the page. If it’s a HUGE page, then it can have more requests. Then again, it could be a good idea to paginate it.
The best thing you can do is delete unnecessary resources (like sliders) and then minimize the overall download size by compressing the remaining resources.
Another thing you can do is combine the CSS and JS files in a single file so that 1 single request is being made. Plugins such as Autoptimize and W3 Total Cache (both mentioned above) can do this. Through the combine option, the plugin basically takes all the CSS and JS files and merges them into a single file.
This way, the browser will only have to make one request to the server for all those files instead of one request for each file.
However, be careful! This option can usually break an entire site or make it display really messed up, so make sure you have a proper backup of the files and database before you start making any changes.
5. Set a Browser Cache Policy
The browser cache automatically saves resources in the visitor’s computer the first time they visit a new website. When users then enter the site a second time, those resources will help them get the desired information at a faster speed, if they return to that page. This way, the page load speed is improved for returning visitors.
For visitors that want to return to a page or visit a new page that in a specific moment can’t be accessed, there’s the option to view the cached version directly from SERP.

The best way to significantly improve the page speed load is to leverage the browser cache and set it according to your needs.
Most of the Minification, Compression and Combination plugins are actually cache plugins, so they all have this function. You can use W3 Total Cache or any other caching plugin suits you best. However, a combination between W3 Total Cache’s caching and Autoptimize’s compression and combining is best.
Using a cache will also make changes harder to spot. If you make a change to your website, open an Icognito tab to see the changes and go to the plugin settings from time to time to reset the cache.
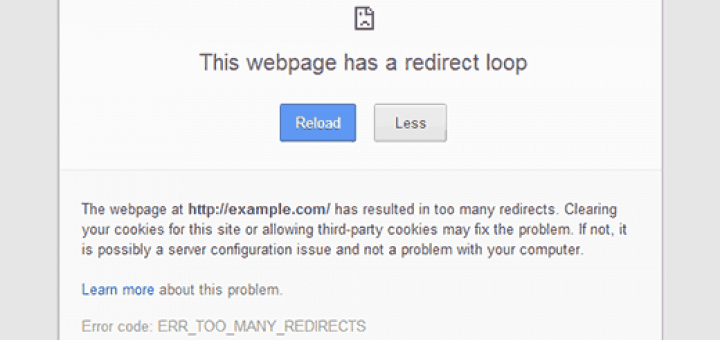
6. Reduce the Number of Redirects & Eliminate Redirect Loop
Redirects can save you from a lot of trouble regarding link equity/juice and broken pages, but it can also cause you lots of problems if you have tons of them. A large number of redirects will load your websites at a slower speed. The more redirects, the more time a user must spend to get on the landing page.
| Plain and simple, WordPress redirects slow down your site. That’s why it’s worth taking the time to minimize the number of redirects visitors to your site experience. There are times that it’s appropriate to intentionally create and use redirection, but limit the use of redirection to necessary instances and make sure your visitors have the fastest experience possible when browsing your WordPress website. | |
| Jon Penland | |
| Support Engineer at Kinsta / @jonrichpen | |
One other thing worth mentioning is that you need to have only one redirect for a page, otherwise you risk having a redirect loop. A redirect loop is a chain of redirects for the same page, which is misleading because the browser won’t know which page to show and will end up giving a pretty nasty error.
Source: www.matrudev.com
In case you have 404 pages, there are lots of ways to customize the page and give some guidelines to the users so you won’t lose them. Design a friendly page and send the user back to your homepage or to another relevant and related piece of content.
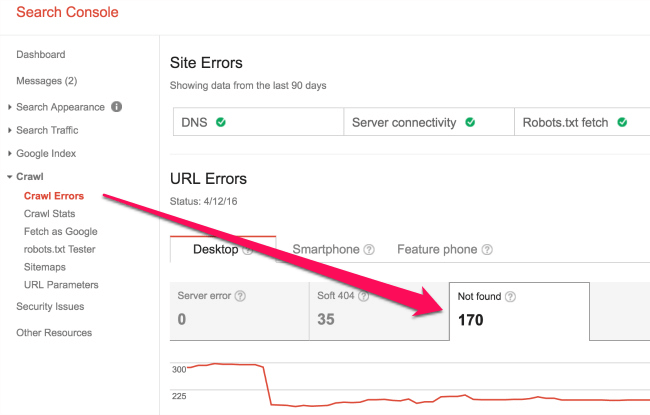
For finding the broken pages for your website, you can use the Google Search Console by looking at Crawl » Crawl Errors, then click on Not found (if any).
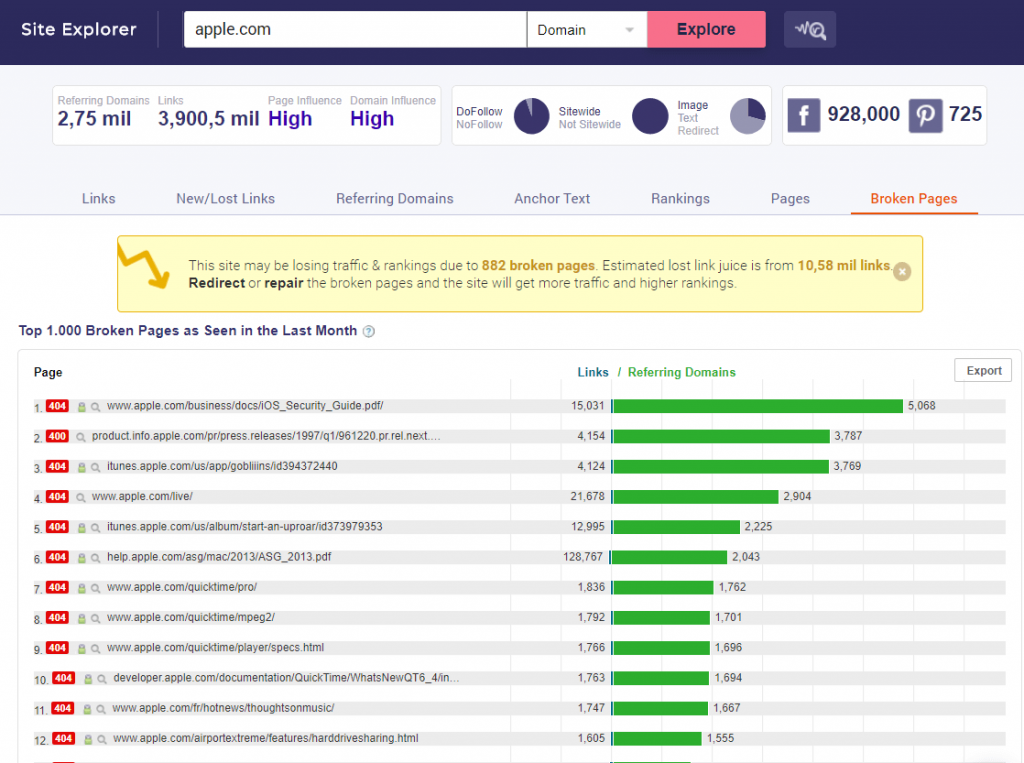
Site Explorer offers a similar feature, pointing out the link juice you are losing (the number of referring domains and links for each broken page).
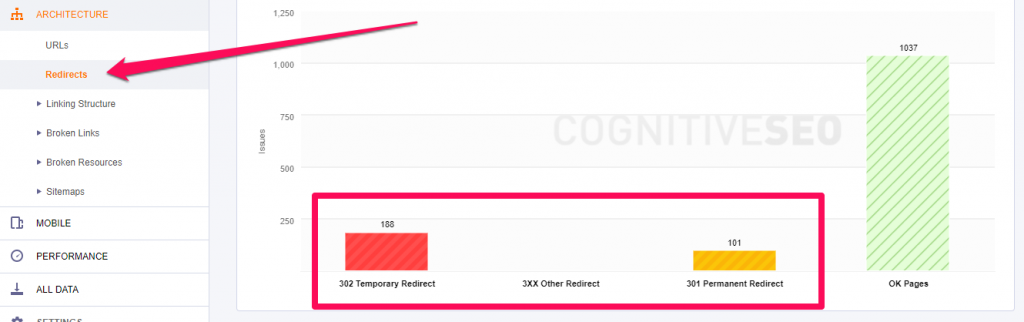
You can also use the new Technical SEO Site Audit Tool to analyze all your site’s redirects. After you set up the campaign and the tool finishes crawling and analyzing your site, simply head to Architecture > Redirects.
7. Avoid Loading Your Site With Too Much Stuff
Over time, sites tend to get clogged up with useless images, plugins and functions that are never used. Why?
If you use WordPress, for example, you might test a lot of plugins and install them on your website, only to find out that you don’t really need them. Sure, you can disable them and eventually uninstall them but the problem with WordPress uninstalls is that they’re often dirty, leaving traces in your Database which can make it a little slower.

Try not to get your site looking like this, it’s probably not the best UX.
Another very common type of plugin that webmasters use are Sliders. Sliders used to be popular but recent testing has shown over and over again that they kill conversions.
Not only that, but Sliders also usually load your site with a lot of things you don’t need. The first one is usually the Javascript file which tends to load on all pages (either in the footer or the head section of your HTML). However, the slider is most probably used only on the homepage.
Also, if you have 6 slides on your homepage, with 6 big pretty images, your site can be 2 or 3 times slower because of the size in bytes of the images. Unfortunately, nobody is probably going to look past the second image, if it auto-slides, of course.
A good workaround is having some sort of development environment where you can test 5-10 plugins until you find exactly what you need. Then, make a plan of implementation so that you know only the essentials you need to install on the live version.
After that, you can reset the development version by deleting it and copying the updated live version to it. This way, the live version will not be clogged either and will resemble the live version more.
II. Website Functionality & Usability
After you make sure your website can load fast for your users, it’s time to see what you can do to improve your visibility in the search engines. There are very many aspects that go into this, but the following ones are a mixture between the most important ones and the most common mistakes that webmasters make.
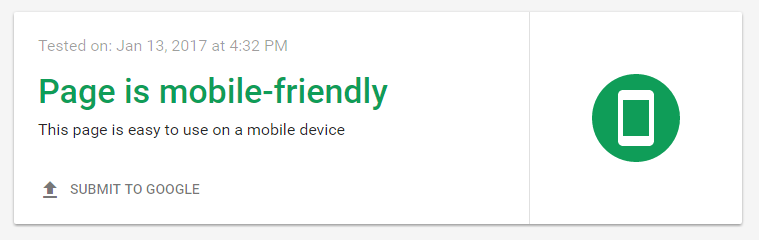
8. Make Sure Your Site Is Mobile Friendly
There’s nothing much to say here. Since more than 50% of all the users worldwide are using their mobile devices to browse the internet, Google has prioritized mobile indexation. You should make sure that your website is optimized for mobile devices.
This is usually meant in terms of design, but also in terms of speed and functionality. Generally, it’s preferred to have a responsive design rather than a fully separate mobile version, as the m.site.com subdomain requires extra steps to be implemented correctly using rel=alternate tag.
You can ensure that your site is mobile friendly by testing it on Google’s Mobile Friendly Test Page.
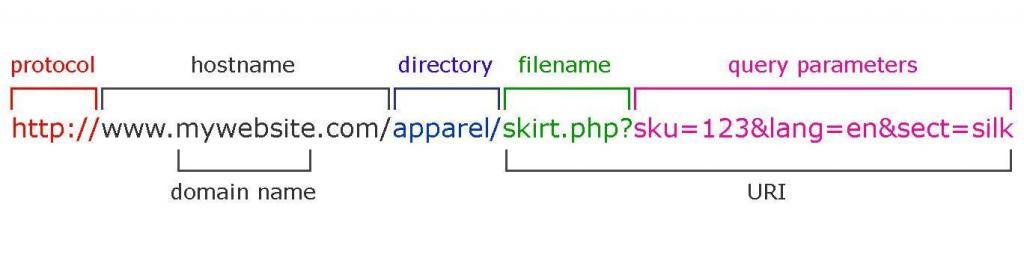
9. Build Search Engine Friendly URLs
URLs are very important because it’s good not to change them. This means you have to get them right the first time. It’s useful for users and search engines to have URLs that are descriptive and contain keywords.
However, many people often forget this and build websites with dynamic URLs that aren’t optimized at all. It’s not that Google doesn’t accept them. They can rank but, eventually, you’ll get to the point where you’ll have to merge to new ones to improve performance, UX and search engine visibility and it’s going to be a struggle.
Changing page URLs very often results in issues with search engines. It’s always better if you get them good the first time.
We’ve talked on this topic various times before because it is important to have easy-to-follow URLs. Avoid having query parameters in URL. You can’t keep track of that URL in Analytics, Search Console and so on. Not to mention it is difficult to do link building. You might lose linking opportunities because of your URLs appearance.
Source blogspot.com
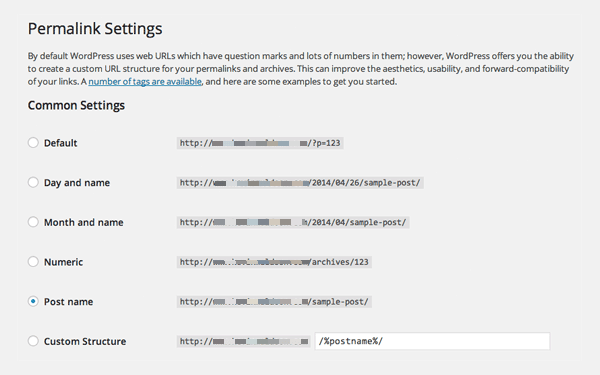
If you’re a WordPress user, you have the option to personalize and set up your permalink structure. If you take a look at the next picture, you can see the options you have for your URL structure.
Building friendly URLs is not so hard, you can follow the next 3 tips:
- use dashes (-) instead or underscores (_);
- make it shorter;
- use the keyword (focus keyword).
Building easy-to-read and focus-keyword-URLs you are thinking about your users and therefore focusing on user experience. David Farkas has the same vision on the matter:
| If you focus on user experience, you’ll be building sustainable links – and building trust with users. To build a truly great link, you have to look at every aspect of the link from the user’s perspective. | |
| David Farkas | |
| Founder & CEO TheUpperRanks | |
You can always check your ‘unfriendly’ URLs using the CognitiveSEO Site Audit. After you set up your campaign, you just have to go to Architecture > URLs.
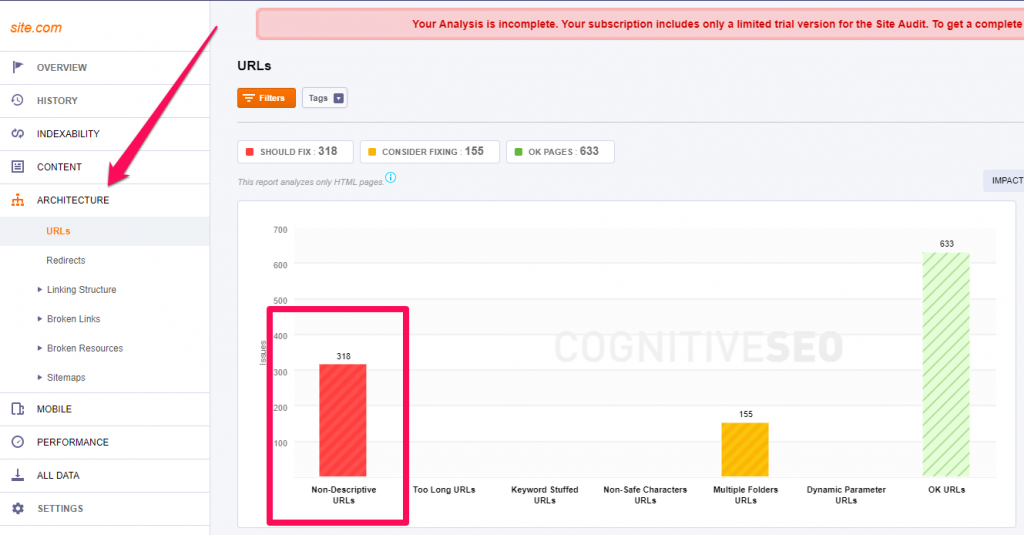
Then you’ll be able to see a list of your URLs that don’t contain any keywords. You can also identify other issues using this feature. For example, in the following screenshot, although the URLs are blurred in order to protect the client’s identity, we’ve identified a hreflang problem. The titles and content for some secondary languages were generated in the main language when proper content in the secondary language was not provided.
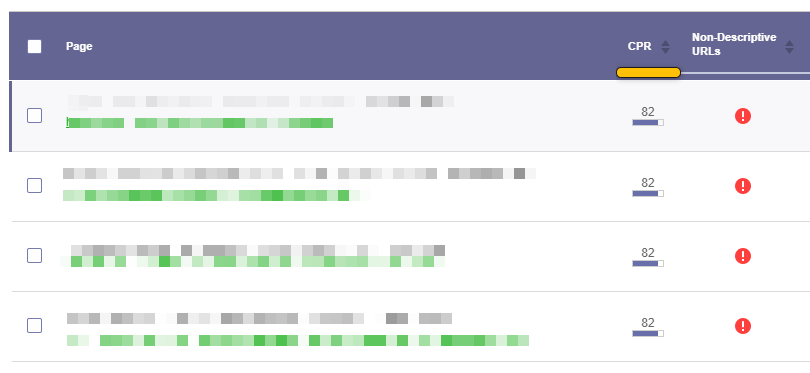
This means that the URLs were actually OK, just not descriptive due to the content being generated in the wrong language.
10. Use the Secure Protocol – HTTPS
On August 6, 2014, Google announced that HTTPS protocol is on their new ranking factors list and recommended to all the sites to move from HTTP to HTTPS.
HTTPS (Hypertext Transfer Protocol Secure) encryptes the data and doesn’t allow it to be modified or corrupted during transfer, while protecting it against man-in-the-middle attacks. Besides, the improvement in data security has other benefits, such as:
- It helps your website have a boost in rankings, since it is a ranking factor.
- It offers referrer details included under “Direct” traffic source in Google Analytics.
- It assures the users that the website is safe to use and that the data provided is encrypted for avoiding hacking or data leaks.
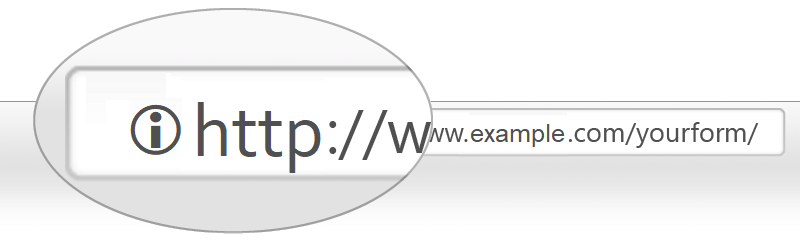
If you use the HTTPS, will see a lock before the URL in the navigation bar:

In case your website doesn’t use the HTTPS protocol, you’ll see an information icon and if you click on it, a new message will alert you that the connection is not safe, therefore the website is not secure.
While it is best to move from HTTP to HTTPS, it is crucial to find the best way to recover all your data after moving your website. For instance, lots of users complained they lost all of their shares after moving the website and the same thing happened to us.
After we experienced the same issue, we’ve created a guideline on how to recover Facebook (and Google+) shares after an https migration that you could easily follow:
- Find out how many Facebook shares you have at a URL;
- Set both your HTTP and HTTPs social shares to zero;
- Update rel=”canonical”;
- Identify Facebook’s Crawler.
Again, this issue is related to URLs so, every time you need to do mass redirects, issues can occur. It’s always a good idea to have your URLs well set up from the beginning. However, if you really need to migrate the site from HTTP to HTTPS, you can check out this HTTP to HTTPS migration guide.
11. Set Your Preferred Version
You also want to make sure that all your other versions are pointing to the correct, preferred version of your site. If people access one version they should automatically be redirected to the correct version.
These are all the versions:
- http://site.com
- https://site.com
- http://www.site.com
- https://www.site.com
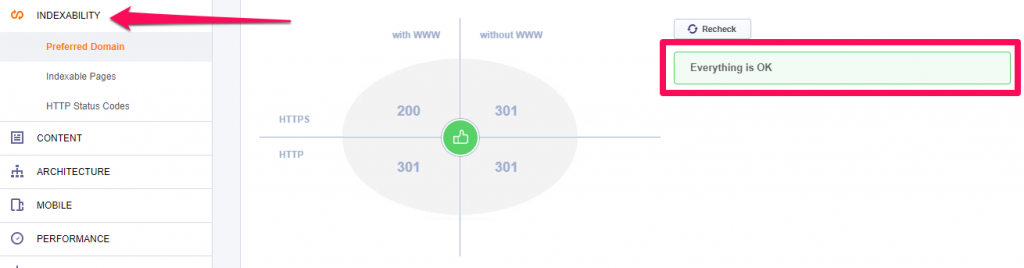
So, if your preferred version is https://www.site.com, all other versions should 301 directly to that version. You can also test if this is alright in the SEO Audit Tool. Simply head to Indexability > Preferred Domain. Look for the Everything is OK message. If you can’t find it, then guess what: not everything is OK.
12. Set up Correctly the 301 Redirects After Site Migration
Site migration is a recommended operation in case the website is changed completely and the same domain won’t be used anymore. Setting up the 301 redirects can be applied in case you make a switchover from HTTP to HTTPS and want to preserve the link equity.
In case of a site migration, it is crucial to set up correctly the redirects. To avoid losing lots of links and have broken pages on your site, it is best to follow a correct 301 redirection procedure. For that, you need to take into consideration the next recommendations. For the vast majority, we’ve already covered some of them in the previous steps:
- Set up the 301 redirect code from the old URLs to the new URLs;
- Avoid redirection loops;
- Remove invalid characters in URLs;
- Verify the preferred version of your new domain (www vs. non-www);
- Submit a change of address in Search Console;
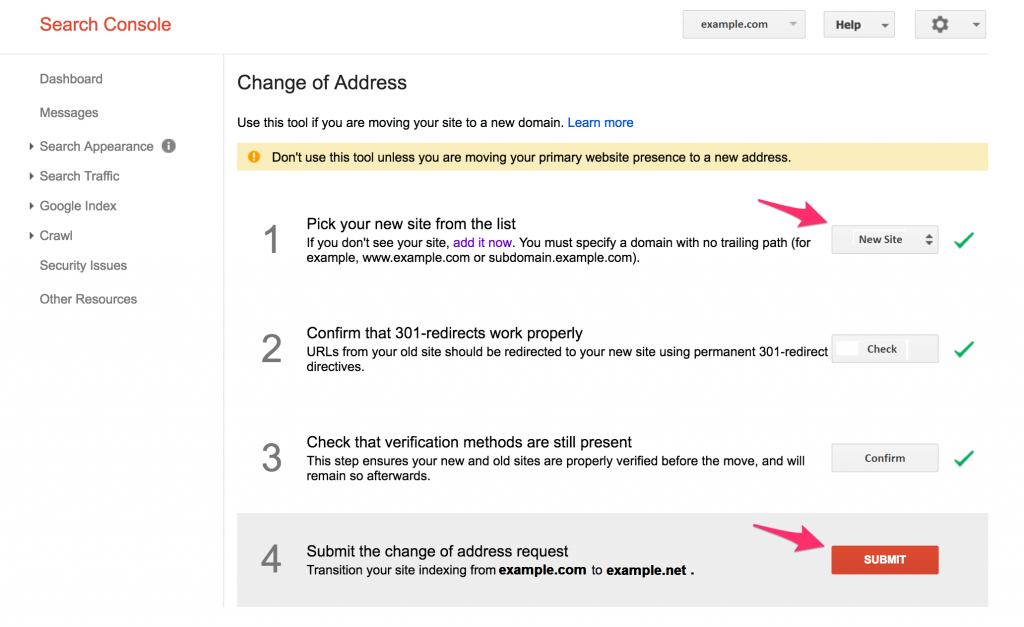
- Submit the new sitemap in Google;
- Check for broken links and resources.
13. Make Sure Your Resources Are Crawlable
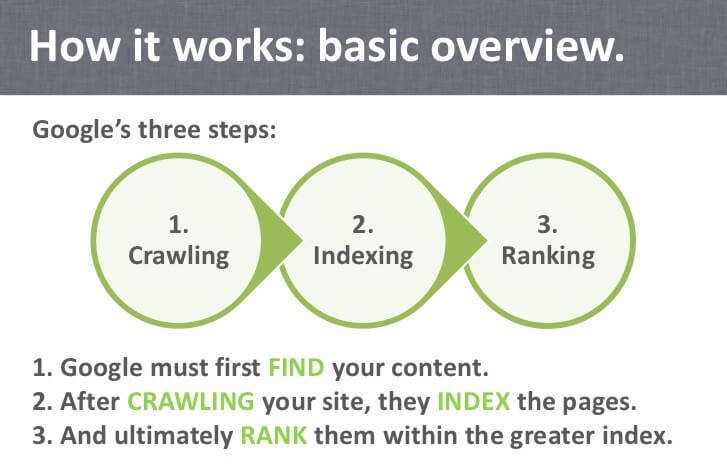
Having non-crawlable resources is a critical search engine optimization technical issue. Crawling is the first step, right before indexing, which comes and puts your content in the user’s hands/eyes. Basically, Googlebot crawls the data and then sends it to the indexer which renders the page and after that, if you’re lucky, you’ll see that page ranking in SERP.
www.slideshare.net/ryanspoon
It is very important that the users see the same content that the Googlebot does.
If your CSS files are closed from indexing, Google won’t be able to see the pages like a users does. The same situation applies to Javascript, if it isn’t crawlable. With JavaScript, it is a little bit more complicated, especially if your site is heavily built using AJAX. It is necessary to write codes for the server to send an accurate version of the site to Google.
If you’re not blocking Googlebot from crawling your JavaScript or CSS files, Google will be able to render and understand your web pages like modern browsers.
Google recommends using Fetch as Google to let Googlebot crawl your JavaScript.
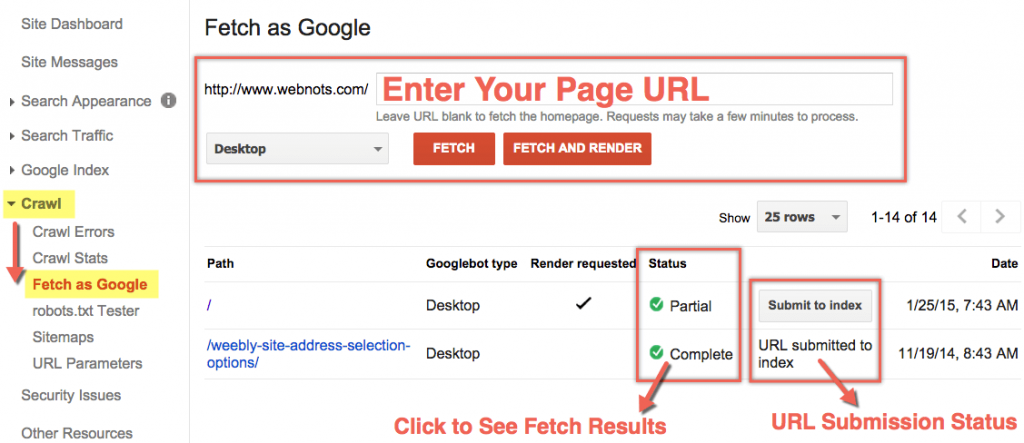
Source www.webnots.com
Update: As of 2019, the Google Search Console has launched a new version which doesn’t have many of the features the old version had. Luckily, you can still access the old version if you need those features. However, they are likely to be completely removed at some point, who knows.
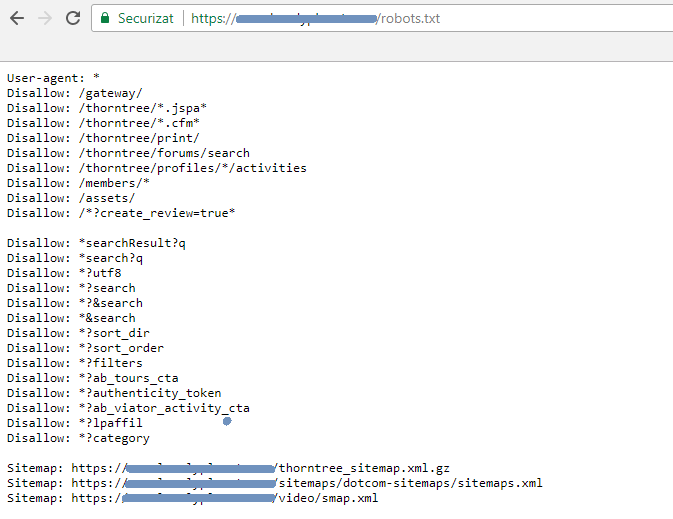
14. Test Your Robots.Txt File to Show Google the Right Content
Crawlability issues are usually related to the robots.txt file. Testing your robots.txt file helps Googlebot by telling it which pages to crawl and which not to crawl. By using this method, you give access to your data to Google.
You can view your robots.txt file online if you search for http://domainname. com/robots.txt. Make sure the order of your files is right. It should look similar to what you can see in the following picture:
Use the robots.txt Tester tool from Search Console to write or edit robots.txt files for your site. The tool is easy to use and shows you whether your robots.txt file blocks Google web crawlers from specific URLs. The ideal situation would be to have no errors:
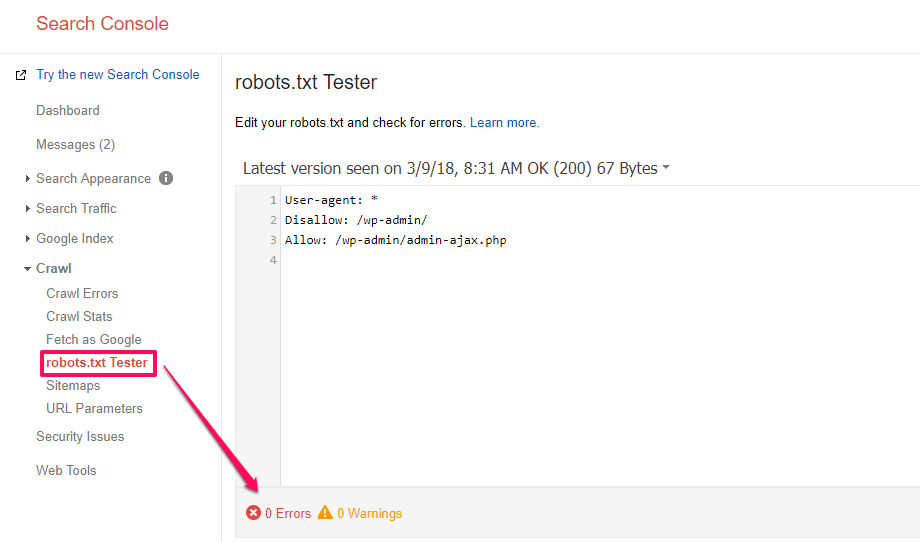
The errors appear when Google is unable to crawl the specific URL due to a robots.txt restriction. There are multiple reasons for that and Google names just some of them:
| For instance, your robots.txt file might prohibit the Googlebot entirely; it might prohibit access to the directory in which this URL is located; or it might prohibit access to the URL specifically. | |
The common issues that appear when Googlebot is blocked to access your website happen because:
- There are DNS issues and Google can’t communicate with DNS server;
- The firewall or DoS protection system is misconfigured ;
- The Googlebot is intentionally blocked from reaching the website.
After you’ve checked the issues and found out which are the blocked resources pointed in the Tester tool, you can test again and see if your website is ok.
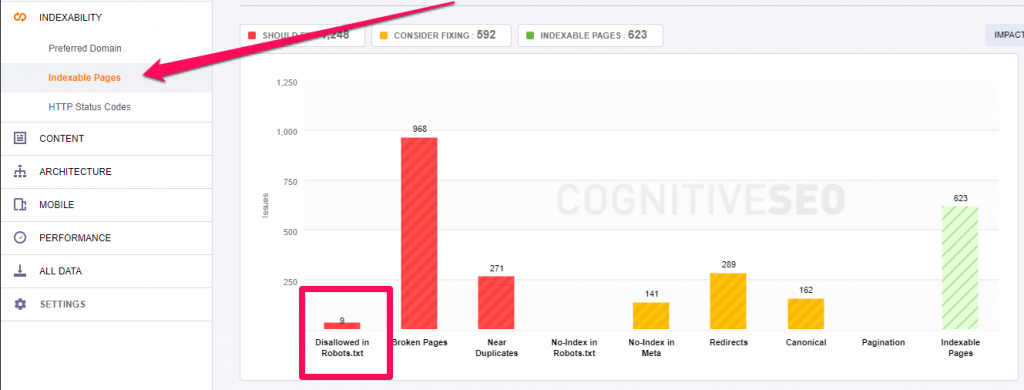
The site’s crawlability can be verified better on a larger scale using the CognitiveSEO Audit Tool. You simply have to go to Indexability > Indexable Pages and look for the Disallowed in Robots.txt links. Click on the red line and it will show you a list of URLs that have been disallowed.
15. Verify the Indexed Content
James Parsons, expert in content marketing and SEO, explains in an article on AudienceBloom the crucial significance of the indexing phase for a website.
| Indexed pages are those that are scoured by Google search engines for possible new content or for information it already knows about. Having a web page indexed is a critical part of a website’s Internet search engine ranking and web page content value. | |
| James Parsons | |
| Blogger at JamesParsons.com | |
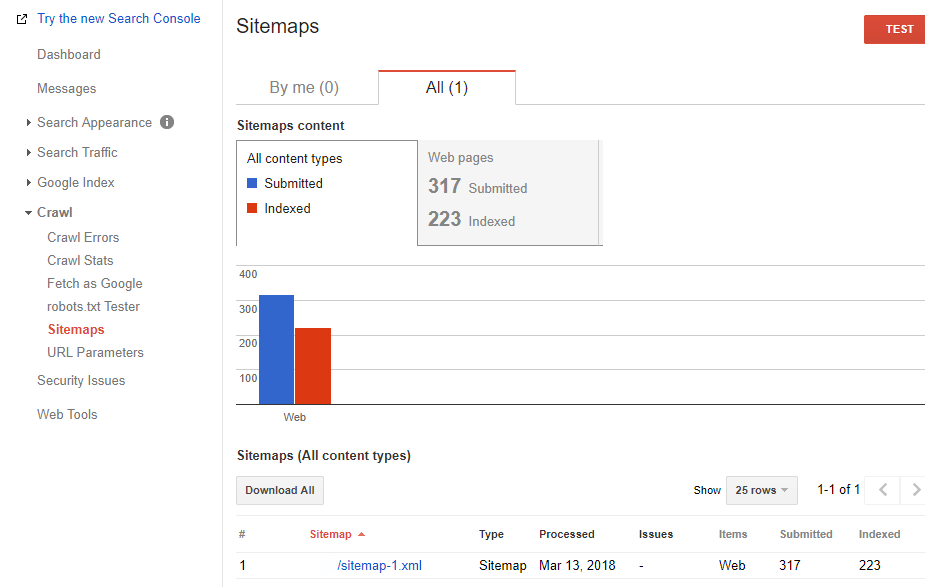
Search Console can provide lots of insightful information regarding the status of your indexed pages. The steps are simple, go to Google Index then to Index Status and you’ll be able to see a similar chart to the one shown below:
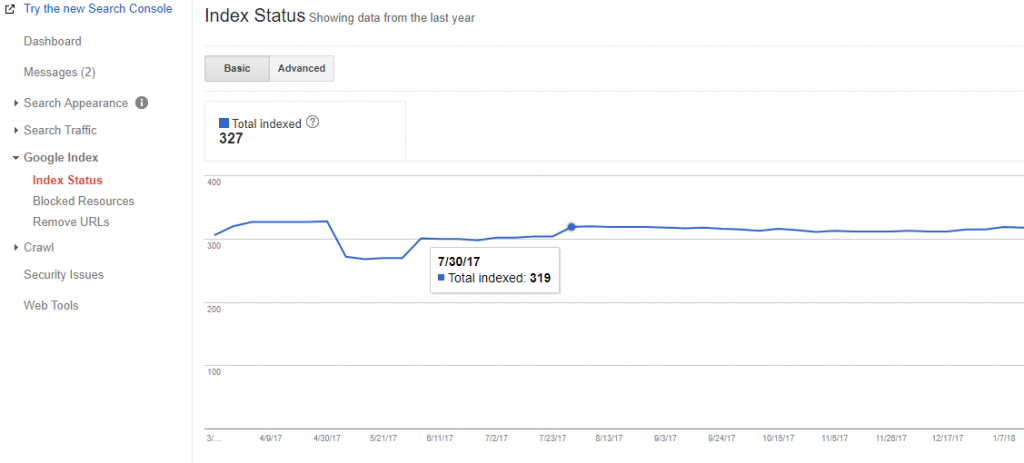
The ideal situation would be that the number of indexed pages is the same as the total number of the pages within your website, except the ones you don’t want to be indexed. Verify if you’ve set up proper noindex tags. In case there is a big difference, review them and check for blocked resources. If that concluded with an OK message, then check if some of the pages weren’t crawled, therefore indexed.
In case you didn’t see something that was out of the ordinary, test your robots.txt file and check your sitemap. For that check the following steps (9 and 10).
You can also use the Site Audit tool to view the URLs that have been marked up with No-Index tag. They’re in the same section as the URLs blocked by Robots.txt (Indexability > Indexable Pages).
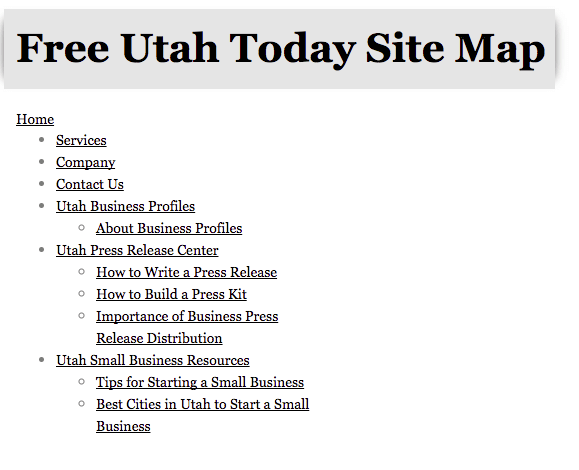
16. Review Your Sitemap to Avoid Being Outdated
An XML Sitemap explains to Google how your website is organized. An example you can see in the picture below:
Source: statcounter.com
Crawlers will read and understand how a website is structured in a more intelligible way. A good structure means better crawling. Use dynamic XML sitemaps for bigger sites. Don’t try to manually keep all in sync between robots.txt, meta robots, and the XML sitemaps.
Search Console comes to rescue once again. In the Crawl section, you can find the Sitemap report, where you can add, manage and test your sitemap file.
Up to this point, you have two options: test a new sitemap or test a previously added one. In the first case:
- Add the Sitemap;
- Enter the URL of the sitemap;
- Click on Test sitemap and then refresh the page if needed;
- When the test is completed, click Open Test Results to check for errors. Fix your errors;
- After you fix your errors, click Submit Sitemap.
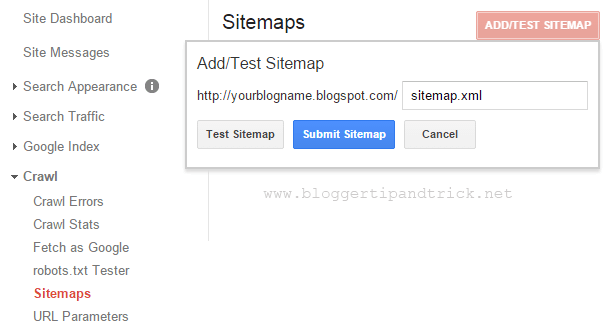
In the second case, you can test an already submitted sitemap; click on Test and check the results.
There are three things you need to do in the situation explained in the second situation.
- Update the Sitemap when new content is added to your site or once in a while;
- Clean it from time to time, eliminating outdated and bad content;
- Keep it shorter so that your important pages get crawled more frequently or break the sitemap into smaller parts. A sitemap file can’t contain more than 50,000 URLs and must not be larger than 50 MB uncompressed.
| Using a sitemap doesn’t guarantee that all the items in your sitemap will be crawled and indexed, as Google processes rely on complex algorithms to schedule crawling. However, in most cases, your site will benefit from having a sitemap, and you’ll never be penalized for having one. | |
17. Review Blocked Resources (Hashbang URLs) with Fetch as Google
Hashbang URLs (URLs that have the #! in them) can be checked and tested in Fetch as Google now. John Mueller acknowledged that Google has the ability to fetch & render hashbang URL’s via the Search Console.
Google stopped supporting them on March 30, 2014, and that changed when it announced on October 14, 2015 that it deprecates their AJAX crawling system. At the moment hashbang URLs can be tested.
Below you can see two situations for the same website. In the first picture, you can see the list of resources before using the fetch and render feature with the hashbang URL and in the second one you can see the situation after the fetch and render action was performed.
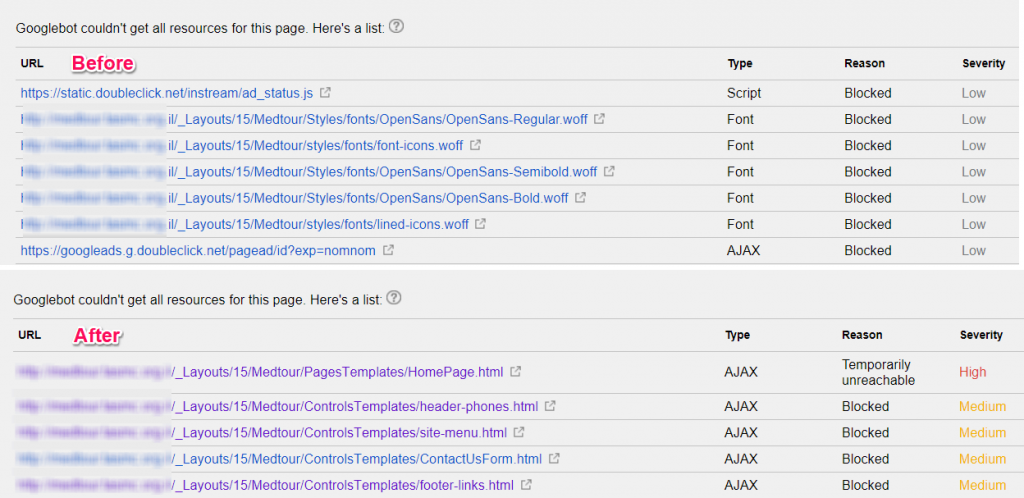
Source: www.tldrseo.com
18. Optimize Your Crawl Budget
The term “crawl budget” started to collect more value when Gary Illyes explained on January 16, 2017 how Google uses it.
Crawl budget means how many resources are allocated for crawling by a server or how many pages are crawled by the search engines in a specific period of time. Google says that there is nothing to worry if the pages tend to be crawled every day. The issues appear on bigger sites. It is very important to optimize your crawl budget.
Maria Cieślak, search engine optimization expert, explains in an article on DeepCrawl the importance of optimizing your crawl budget.
| Google is crawling only a particular number of pages on your website, and may sort the URLs incorrectly (I mean differently than you wish). For example, the “About us” page (that doesn’t drive sales) can gain more hits than the category listings with the new products. Your aim is to present to Google the most relevant and fresh content. | |
| Maria Cieślak | |
| SEO Specialist at Elephate | |
The crawl limit rate comes into discussion, which limits the maximum fetching rate for a given site.
The actions recommended for optimizing the crawl budget are:
- Check the soft 404s and fix them using a personalized message and a custom page;
- Get rid of duplicate content to avoid wasting crawl budget;
- Remove hacked pages;
- Prevent indexation for low quality and spam content;
- Keep your sitemap up to date;
- Correct infinite space issues;
19. Avoid Meta Refresh for Moving a Site
Since we’ve talked about the redirection plan for migrating a site, it is best to understand why Google doesn’t recommend using meta refresh for moving a website. There are three ways to define redirects:
- HTTP responses with a status code of 3xx;
- HTML redirections using the <meta> element;
- JavaScript redirections using the DOM.
Aseem Kishore, owner of Help Desk Geek.com, explains why it is better not to use this meta refresh technique:
| Although not particularly dangerous, Meta Refreshes are often used by unscrupulous webpage programmers to draw you into a web page using one piece of content and then redirect you to another page with some other content. Referred to as a black hat technique, most of the major search engines are smart enough not to fall for this method of “cloaking” web content. | |
| Aseem Kishore | |
| Owner and Editor-in-Chief at Help Desk Geek.com | |
When possible, always try to use HTTP redirects, and don’t use a <meta> element. HTTP redirection is the preferred option, but sometimes the web developer doesn’t have control of the server or can’t control it. And they must use other methods. Although HTML redirection is one of them, Google strongly discourages web developers to use it.
If a developer uses the HTTP redirects and forgets the HTML redirects, they aren’t identical anymore and might end up in an infinite loop, which leads to other problems.
In case you want to move a site, Google guidelines recommend to follow the next steps:
- Read and understand the basic knowledge of moving a website;
- Prepare the new site and test it thoroughly;
- Prepare a URL mapping from the current URLs;
- Correctly configure the server to make the redirects to move the site;
- Monitor the traffic for old and URLs.
20. Use Redirect for Flash Site to the HTML Version
Creating a flash site without a redirect to the HTML version is a big SEO mistake. Flash content might have an appealing look, but just like JavaScript and AJAX, it is difficult to render. The crawler needs all the help it can get to crawl the data and send it to the indexer. The Flash site must have a redirect to the HTML version.
If you have a pretty site, what’s the point if Google can’t read it and show it the same way you’d want it to? Flash websites might tell a beautiful story, but it’s all for nothing if Google can’t render it. HTML is the answer! Build an HTML version with SWFObject 2.0. This tool helps you optimize flash content.
21. Use Hreflang for Multi-Language Websites
Hreflang tags are used for language and regional URLs. It is recommended to use the rel=”alternate” hreflang=”x” attributes to serve the correct language or regional URL in Search results in the next situations:
- You keep the main content in a single language and use translate the template (navigation and footer). Best used for user-generated content.
- You have small regional variations with similar content in a single language. For a website that uses the English language targeted to the US, GB, and Ireland.
- You have a site content that is fully translated. For websites where you have multiple language versions of each page.
Maile Ohye, former Developer Programs Tech Lead, explains how site owners can expand to new languages variations and keep the search engines friendly:
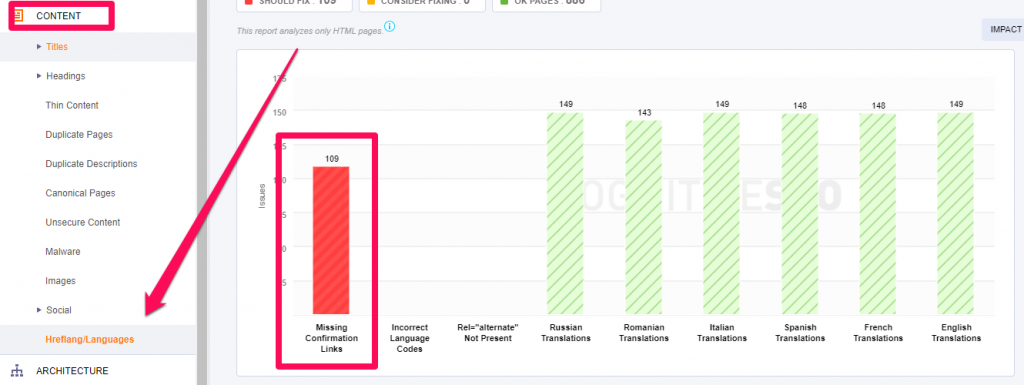
Based on these options, you can apply multiple hreflang tags to a single URL. Make sure, though, the provided hreflang is valid:
- It doesn’t have missing confirmation links: If page A links to page B, page B must link back to page A.
- It doesn’t have incorrect language codes: The language codes must use them in ISO 639-1 format and optionally the region must be in ISO 3166-1 Alpha 2 format.
We’ve documented a complete guideline on the vital hreflang & multi-language website mistakes that most webmasters make, that we recommend you to follow.
Also, you can use the Site Audit to quickly analyze and identify hreflang issues on your website. Simply head to Content > Hreflang/Languages to get a list of your implementation issues. In the following screenshot you can see that this site has a lot of missing confirmation links, which means that Language A Page points to the Language B Page but Language B Page doesn’t point back to Language A Page.
22. Make Sure Your Tracking Is Working Properly
Tracking your website is really important. Without tracking your results, you won’t be able to see any improvements.
Tracking issues are common after migrations from HTTP to HTTPS or after minifying and combining JS files. They can break the tracking code resulting in a loss of data.
You need to make sure that everything is working properly so that you can track the results of the improvements you’re making over time.
III. Content Optimization
Now that you’ve fixed the general issues that can create crawlability and indexability issues, you can focus more on specific issues regarding your content, such as broken pages, internal linking and so on.
This is very important if you really want to surpass your competition, especially in highly competitive markets.
23. Redirect/Replace Broken Links & Resources
Sometimes the images from a webpage aren’t available, so a broken image is displayed in the client’s browser. It can happen to everybody. There are lots of reasons for that. And it is not a pretty situation. You know the saying: A picture is worth a thousand words and a missing picture with an ugly icon with a message will say something as well…

A solution would be to add an error handler on the IMG tag:
|
1 |
<img src="http://www.example.com/broken_url.jpg"onerror="this.src='path_to_default_image'" /> |
Some webmasters say that Chrome and Firefox recognize when images aren’t loaded and log it to the console, while others have other opinions.
Sam Deering, web developer specialized in JavaScript & jQuery, offers some great steps to resolve these issues:
- Firstly, search for some information on the current images on page;
- Secondly, use AJAX to test if the image exists;
- Then refresh image;
- Fix broken images using AJAX;
- Check the Non-AJAX function version.
| In most browsers, the ALT tag is shown if the image is not found. This could be a problem if the image is small and the ALT tag is long as it seems the output width of the element is not forced by the length of the alt tag. | |
| Sam Deering | |
| Front-end Web Developer | |
This is also the case with broken URLs. Although nothing weird will be displayed on the site, if the user clicks on a broken link, it will lead to a bad experience. You can view which resources are broken on your website by heading to the Architecture section in the Site Audit tool.
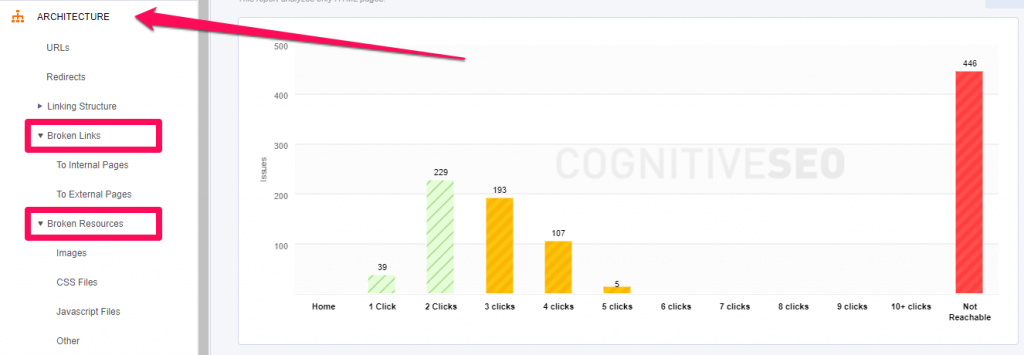
24. Audit Internal Links to Improve Your Chances to Rank Higher
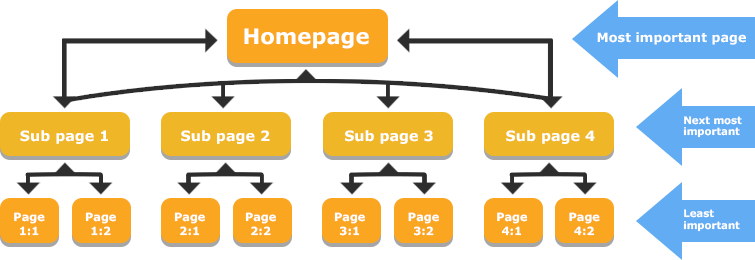
Internal links are the connection between your pages and, due to them, you can build a strong website architecture by spreading link juice, or link equity, as others refer to it.
Creating connections between similar pieces of content creates the terminology of Silo content. This method presumes to create groups of topics and content based on keywords and it defines a hierarchy.
Source: www.seoclarity.net
There are a lot of advantages for building internal links because it:
- opens the road to search engines spiders by making it accessible;
- transfers link juice;
- improves user navigation and offers extra information to the user;
- organizes the pages based on the keyword used as an anchor text;
- highlights the most important pages and transfers this information to the search engines;
- organizes site architecture.
|
The more relevant pages are combined with each other when crawled repeatedly, and as the crawling frequency rises, so does the overall rank in search engines. |
|
| Kasia Perzyńska | |
| Content Marketer Unamo | |
When you audit internal links, there are four things that need to be checked:
- Broken links;
- Redirected links;
- Click depth;
- Orphan pages;
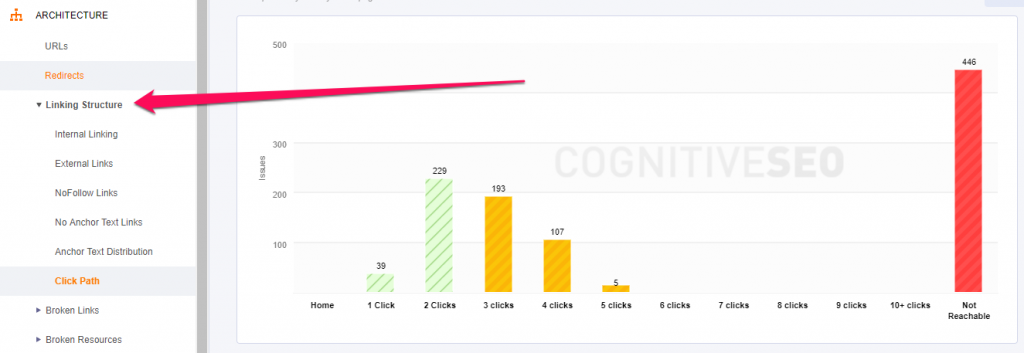
You can easily do all of those using the CognitiveSEO Site Audit Tool under Architecture > Linking Structure.
25. Get Rid of Duplicate Content
When we talk about technical SEO, we also think of duplicate content, which is a serious problem. Be prepared and review your HTML Improvements from Search Console to remove the duplicates.
Keep unique and relevant title tags, descriptions within your website by looking into the Search Console at Search Appearance » HTML Improvements.
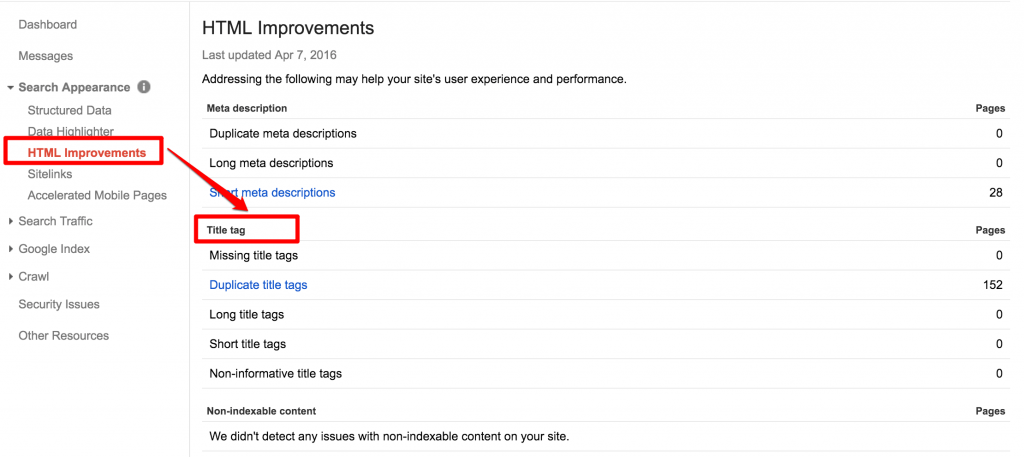
In Search Console, you can find a list of all the duplicate content leading you to the pages that need improvement. Remove or review each element and craft other titles and meta descriptions. Google loves fresh and unique content. Panda algorithm confirms it.
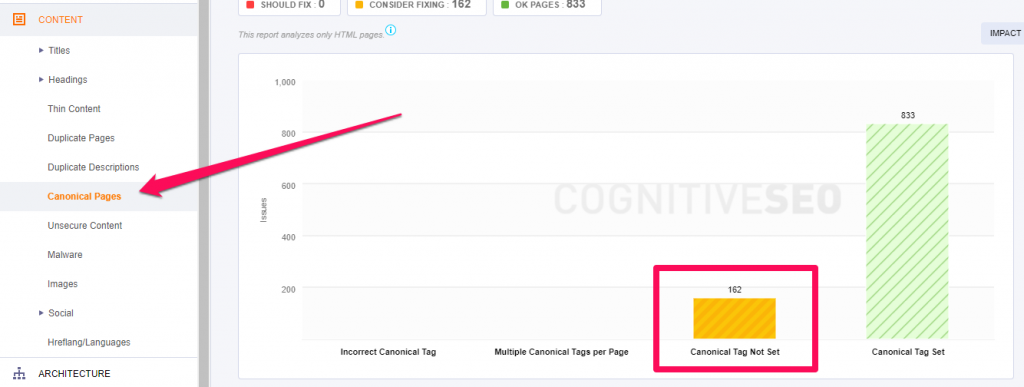
Another option would be to apply the canonical tag to pages with duplicate content. The tag will show to the search engines which is the original source with your rel=canonical tag. Canonicalizing irrelevant URLs to avoid content duplication is a recommended practice.
Jayson DeMers, Founder & CEO of AudienceBloom, considers that duplicate content can affect your website and discourage search engines to rank your website and it can also lead to bad user experience, as he says on Forbes.
| Just a few instances of duplicate content can trigger Google to rank your site lower in search results, leaving you unable to recover until those content duplication issues are addressed. Duplicate content can also interfere with your user experience, leaving your site visitors feeling that your site is more fluff than substance. | |
| Jayson DeMers | |
| Founder & CEO of AudienceBloom | |
The CognitiveSEO Site Audit Tool can not only easily identify Duplicate Content, but it also has a feature to identify near duplicate content, which are pages that are very similar in content but not quite the same.
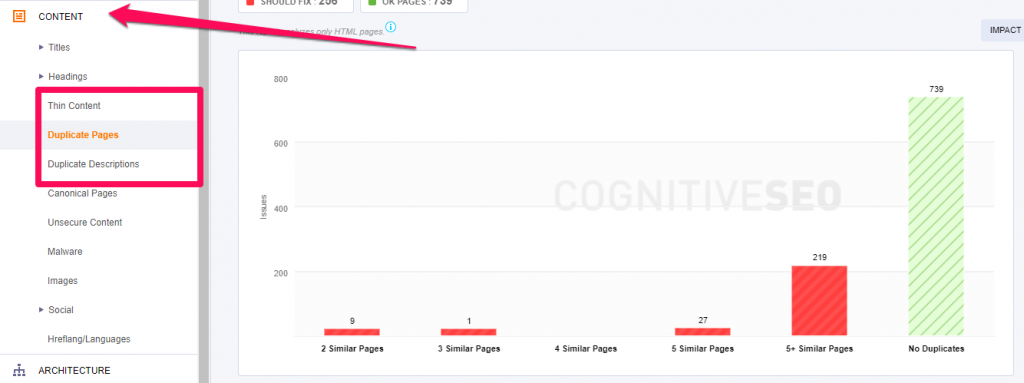
Fixing duplicate content issues is critical, especially for eCommerce websites where this practice/issue is common. The tool makes it very easy to fix.
26. Use Structured Data to Highlight Your Content
Structured data is the way to make Google understand your content and help the user choose and get directly on the page they are interested in through rich search results. If a website uses structured markup data, Google might display it in SERP as you can see in the following picture:
Beside rich snippets, structured data can be used for:
- Getting featured in the Knowledge graph;
- Gaining beta releases and having advantages in AMP, Google News, etc.;
- Helping Google offer results from your website based on contextual understanding;
Source: www.link-assistant.com
The language for structured data is schema.org. You can highlight your content using structured data. Schema.org helps webmasters mark up their pages in ways that can be understood by the major search engines.
If you want to get in rich search results your site’s page must use one of three supported formats:
- JSON-LD (recommended);
- Microdata;
- RDFa.
After you highlight your content using structured data, it is recommended to test it using the Google Structured Data Testing Tool. Testing it will give you great directions to see if you set it right or if you didn’t comply with Google’s guidelines because you can get penalized for spammy structured markup.
Google doesn’t guarantee the appearance of each content highlighted using structured data markup.
27. Keep a Reasonable Number of Links On-Page
People from the web community often associate pages with 100 links or more with “link farms”. Also, UX has a significant impact on the number of links on a single page. A piece of content abundant of links will distract the users and fail to offer them any piece of information because most of it is linked. You need to add links only where you think it is relevant and it can offer extra information or you need to specify the source.
Patrick Sexton, Googlebot Whisperer, explains in an article on Varvy why it is important to keep a reasonable amount of links per page:
| You may also wish to consider how well your webpage is linked to. If a webpage has many quality links pointing to it, that webpage can have many links (even more than 100) but it is important to remember the reasons why you shouldn’t have a huge amount of links on any given page. | |
| Patrick Sexton | |
| Googlebot Whisperer at Outspoken Media | |
In general, the more links on the page, the higher the need to keep that page more organized in order for the user to get the information they came for on that page. Also, be careful to search for natural ways to add links and don’t violate Google’s guidelines for building links. The same recommendation applies for internal links.
28. Avoid Canonicalizing Blog Pages to the Root of the Blog
John Mueller said in one Google Webmaster Hangout that Google’s doesn’t encourage canonicalizing blog subpages to the root of the blog as a preferred version. Subpages aren’t a true copy of the blog’s main page so doing that has no logic.
You can listen to the whole conversion from minute 16:28:
Even if Google sees the canonical tag, it will ignore it because it thinks it’s a webmaster’s mistake.
| Setting up blog subpages with a canonical blog pointed to the blog’s main page isn’t a correct set up because those pages are not an equivalent, from Google’s point of view. | |
| John Mueller | |
| Webmaster Trends Analyst at Google | |
Canonical links are often misunderstood and incorrectly implemented, so make sure you check all your URLs for bad canonical implementation. You can do this easily with the Technical SEO Audit tool by CognitiveSEO.
Remember that it’s a good idea to always have a self-referencing canonical tag pointing to your page. This will ensure there are less duplicate content issues.
IV. User-Friendlier Website
Google cares about UX, so why wouldn’t you? Many experts think that UX is crucial in the future of SEO, especially with all the evolution of machine learning technology. David Freeman, Search Engine Land Columnist, has a strong opinion on the role of UX:
| Part of Google’s philosophy has always been focused on delivering the best user experience. With recent technological advances, Google and other search engines are now better placed than ever to deliver this vision. | |
| David Freeman | |
| Group Head of SEO at Treatwell & Search Engine Land Columnist | |
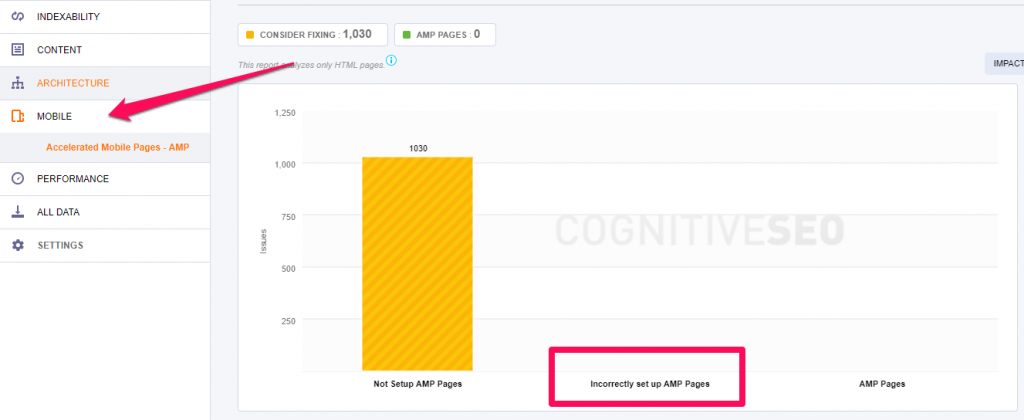
29. Set up Your AMP the Right Way – Mobile Friendlier
Google recommends using AMP (Accelerated Mobile Pages) to improve the UX, highly valued by the company. Since the Google AMP change will affect a lot of sites, it is best to understand the way it works and the right way to set it up/install it on different platforms: WordPress, Drupal, Joomla, Concrete5, OpenCart or generate custom AMP Implementation.
On this topic, we created a guideline on how to implement AMP because it is a process which needs full understanding. Google AMP doesn’t directly affect SEO, but indirect factors that result from AMP can.
| Historically, Google has acted as an index that points people away from Google to other websites. With its AMP search results, Google is amassing content on its own servers and keeping readers on Google. | |
| Klint Finley | |
| Content writer at Wired Business / @klintron | |
AMP is pretty difficult to implement correctly. You can always run into issues. Miss one tag closing bracket and you risk your AMP version not displaying at all. You can test the format of all your site’s AMP pages quickly using the CognitiveSEO Tool.
In the following example there are no AMP pages set up, but if you have any, you may want to take a look at the Incorrectly set up AMP Pages section to identify the problematic ones:
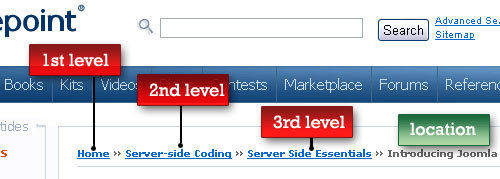
30. Add Breadcrumbs for a Better Navigation
Breadcrumbs, used by Hansel and Gretel to find their way back home, are implemented by websites with the same purpose, to lead the user through the website. They help the visitors understand where are they located on the website and give directions for an easier accessibility.
Source: www.smashingmagazine.com
Breadcrumbs can improve the user-experience and help search engines have a clear picture of the site structure. Fulfilling the need to a second navigation on the website, breadcrumbs shouldn’t replace the primary navigation though.
Another advantage of them is that they reduce the number of actions and clicks a user must take on a page. Instead of going back and forth, they can easily use the link level/category to go where they want. A technique can be applied to big websites or e-commerce sites.
W3Schools exemplifies how to add breadcrumbs in two steps.
- Add HTML
|
1 2 3 4 5 6 |
<ul class="breadcrumb"> <li><a href="#">Home</a></li> <li><a href="#">Pictures</a></li> <li><a href="#">Summer 15</a></li> <li>Italy</li> </ul> |
- Add CSS
|
1 2 3 4 5 6 7 8 9 10 11 12 13 14 15 16 17 18 19 20 21 22 23 24 25 26 27 28 29 30 31 |
/* Style the list */ ul.breadcrumb { padding: 10px 16px; list-style: none; background-color: #eee; } /* Display list items side by side */ ul.breadcrumb li { display: inline; font-size: 18px; } /* Add a slash symbol (/) before/behind each list item */ ul.breadcrumb li+li:before { padding: 8px; color: black; content: "/\00a0"; } /* Add a color to all links inside the list */ ul.breadcrumb li a { color: #0275d8; text-decoration: none; } /* Add a color on mouse-over */ ul.breadcrumb li a:hover { color: #01447e; text-decoration: underline; } |
If you want a simpler solution, you can use plugins for WordPress, such as Breadcrumb NavXT Plugin or Yoast SEO.
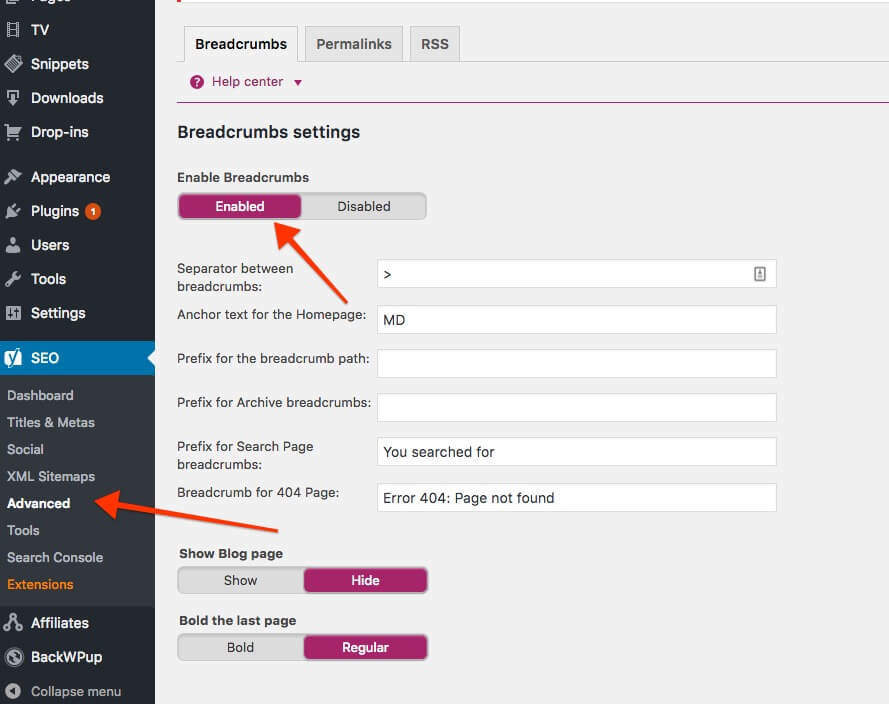
Go to SEO in Dashboard, then click on Advanced and select Enable Breadcrumbs » Save changes. This method will apply the default setting for your breadcrumbs.
31. Test On as Many Platforms and Devices as Possible
People use different devices. If you want your users to have a good experience, you need to test on multiple devices. As many as you can!
You can start with Chrome by right clicking and hitting Inspect. Then you can toggle the device toolbar and select the type of device you want to view your site on.
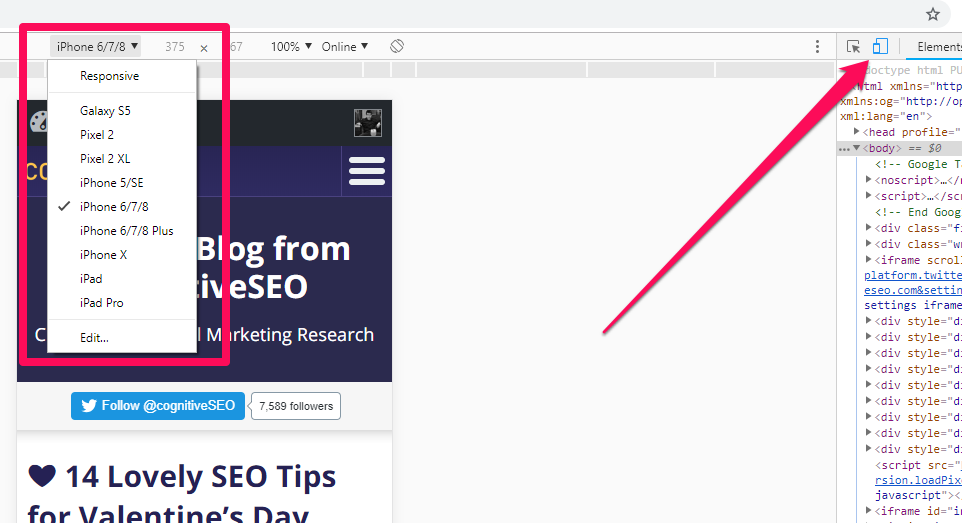
You can also use 3rd party tools, such as ScreenFly.
However, keep in mind that these tools only take the screen width into consideration. For example, if you don’t own an iOS device, you’ll never know that WEBM format videos don’t play on Safari Browser.
You really need to test on different devices and browsers. Test on Windows, iOS, Linux, Safari, Firefox, Edge, Chrome, Opera and even the sad, old and forgotten Internet Explorer.
If you don’t own an Android or an iPhone/iPad, go to a store if needed or find a friend. Whenever you can get your hands on a new device, take a minute or two to browse your website.
V. Auditing Your Brand Signals for AI Visibility
While completing technical SEO checks ensures your website is crawlable, fast, and properly structured, modern search systems evaluate much more than on-page performance alone. Generative AI engines and advanced ranking algorithms also assess the external authority and trust signals associated with your brand across the wider web.
Even a technically optimized website can struggle to achieve visibility if the entity behind it lacks consistent, verifiable mentions and credibility across trusted sources. To measure and strengthen this external layer, the BrandMentions platform is essential.
As a dedicated AI visibility platform, BrandMentions bridges the gap between technical SEO and off-page authority by monitoring how your brand appears across the open web. Unlike traditional SEO crawlers that focus only on your site, it tracks unstructured brand mentions across news sites, forums, blogs, and social media in real time.
Through its AI-driven insights, BrandMentions helps identify how your brand is perceived, how often it is referenced in authoritative contexts, and how these signals contribute to SEO, AEO, and AI-generated citations.
By combining technical optimization with external visibility tracking, BrandMentions provides a complete view of your digital presence, ensuring your website performance is supported by a strong and trustworthy brand footprint across the entire web.
Conclusion
Firstly, this SEO guide offers solutions and points out directions on how to make a website fast and decrease the loading time by following the recommendations on Google Speed Insights and Google developers’ guidelines.
Secondly, we went through the functional elements of a website, by trying to check and resolve issues related to crawling errors, indexing status, using redirects and making a website accessible to Google.
Thirdly, we looked for improving and optimizing the content by resolving critical technical SEO issues. We discussed how to remove duplicate content, replace missing information and images, make a strong architecture website, highlighting our content and making it visible to Google.
Lastly, we pointed out two issues regarding the mobile-friendliness sites and navigational websites.


Thanks for the good post!
A truly complete and well explained resource. Congratulations on the article
Thanks, Vincenzo!
You’ll be expecting you for our next articles.
Your detailed description of image, code, and content make your post Excellent for beginners and not only. Thanks for sharing this with us!
You’re welcome, Jhanvi. Good luck!
Hey this is just too much…..
I need someone to do this for me, is there anyone out there that can help?
Hi Casey,
You’d better talk to a consultant or an expert that could help you resolve your particular issues because each website is different. Our article can guide you to see exactly what you can do.
Hi Andreea, really good article! I enjoy it.
There is one point I desagree with you. When you stating that “The term “crawl budget” appeared for the first time on January 16, 2017, when Gary Illyes explained what it means for Google.”
That particular term was available and knowed for several year, so to reduce it on Garry Illyes explaination is pretty wrong.
Hi Herman,
Thank you for the heads up. Fully noted. We’ll take care of that 🙂
It’s great to see we have such dedicated readers. Hope our next articles will be of interest to you 🙂
Extensive SEO checklist. Thanks for sharing.
Great article, thank you so much! Very useful.
Hello!
This checklist is awesome! I agree with user friendly website, because the visitors are the one using/experiencing our website, we should provide them with easy to navigate, minimal design website, but packed with information that they need, and also fast loading.
Nice work!
-Kevin
There are too many things to consider best SEO audit, one of them is image file size, it should be a compressed and small in size. Loading time also affect user experience if loading time is more than 3 second it will not good for website.
Thanks so much I always learn something new 🙂
This checklist is super dope. I will actually apply it on the client projects from now onwards
Great article. Helps to target the right audience and send them solutions which will win them over and bring them more closely to the brand
This is such an exhaustive post! I love it. Thank you for putting it together. It literally covers everything. Super helpful.
from the point of seo analyst its a life saviour,
This is a very good article and many thanks for such a wonderful job